

Moda Jelly Rolls: A Complete Guide to Quilting
Table of Contents
- What Are Moda Jelly Rolls?
- Understanding 2.5 Inch Fabric Strips for Quilting
- What to Make with a Jelly Roll
- Moda Jelly Roll Quilt Patterns for Every Skill Level
- Jelly Roll Quilt for Beginners: Your First Project
- Common Mistakes When Working with Jelly Rolls
- Frequently Asked Questions
Last Updated: October 10, 2026
What Are Moda Jelly Rolls?
A Moda Jelly Roll is a pre-cut fabric bundle containing 40 strips of 100% cotton, each measuring 2.5 inches wide and 44 inches long. These strips come in coordinating colours and designs, carefully selected to work together beautifully. The collection features a mix of fabrics from various designers under the Moda brand, ranging from classic and traditional patterns to modern and bold styles.

Jelly rolls take the guesswork out of fabric selection. Instead of hunting through fabric shops to find colours that complement each other, you get a curated collection ready to use. At Fabric Mouse, we stock several Moda Jelly Roll options, including the To Be Jolly collection by One Canoe Two and the Good Times Jelly Roll by American Jane, each offering distinct colour palettes and design aesthetics.

The beauty of a Moda Jelly Roll lies in its versatility. Quilters use them for quick projects, patchwork, cushions, and decorative crafts. Beginners appreciate the simplicity: no complex calculations, no endless decisions about which fabrics to pair together.
Understanding 2.5 Inch Fabric Strips for Quilting
The 2.5 inch width is the industry standard for jelly roll strips, and there's a practical reason for this measurement. Strips this size are large enough to create visible design impact in your quilt but small enough to work with comfortably on a standard sewing machine.
When you piece 2.5 inch fabric strips together, you create blocks with interesting visual depth. The width accommodates seam allowances (typically 0.25 inches on each side) while still leaving you with a 2 inch finished strip. This measurement works perfectly with most rotary cutters and quilting rulers.
The 44 inch length is standard for quilting cotton. It's the width of fabric as it comes off the bolt at mills. A Moda Jelly Roll gives you 40 strips, totalling 1,760 inches of fabric, enough for most small to medium quilting projects without needing additional yardage.
Different projects call for different strip widths. Some quilters prefer 1.5 inch strips for smaller, more intricate designs. Others use 5 inch strips for larger, bolder blocks. But the 2.5 inch strip remains the most versatile and popular choice for both beginners and experienced quilters.
What to Make with a Jelly Roll
Quick Projects for Rapid Results
A Moda Jelly Roll opens up dozens of project possibilities. Here are the fastest options:
Strip quilts are the quickest. You simply sew strips end-to-end, press, cut into blocks, and arrange them into a finished quilt top. Many quilters complete a strip quilt in a single weekend.
Cushion covers use just a handful of strips. Cut your strips into squares, arrange them in a simple pattern, sew them together, and you have a cushion front ready for backing.
Table runners require only 4-6 strips sewn together lengthwise. Press, trim to size, add backing, and you're finished. Perfect for using up leftover strips.
Patchwork bags combine strips into a simple rectangular panel. Line it, add handles, and you have a functional tote.
Blankets and throws work beautifully with jelly roll strips. Sew strips into a simple grid pattern, add wadding and backing, quilt it, and bind the edges.
The advantage of these projects is speed. You can start and finish within days rather than weeks.
Larger Projects Using Multiple Rolls
For bigger ambitions, you can combine multiple Moda Jelly Rolls to create:
Full-sized bed quilts typically need 2-3 jelly rolls, depending on your design. This gives you enough fabric variety and volume to cover a full mattress.
Lap quilts usually require 1-2 rolls. They're large enough to wrap up in but manageable for first-time quilters.
Complex patchwork designs like log cabin, rail fence, or nine-patch patterns use multiple rolls to create intricate visual patterns. Each roll contributes different colours and designs to the overall composition.
Quilted wall hangings can use strips from one or more rolls, depending on the size you want. A 40-50 inch square wall hanging typically needs one full roll.
When working with multiple rolls, you gain flexibility in design. You can mix and match different Moda collections to create unique colour combinations. For example, combining the To Be Jolly collection with the Days in Paris collection by Zen Chic creates an interesting blend of traditional and contemporary designs.

Moda Jelly Roll Quilt Patterns for Every Skill Level
Moda Jelly Roll patterns range from dead simple to genuinely complex. The key is matching the pattern to your experience level.
Beginner patterns typically involve straight seams and simple arrangements. Strip sets sewn together, then cut into blocks and reassembled. No complex angles, no Y-seams, no tricky intersections. These patterns teach you the fundamentals without overwhelming you.
Intermediate patterns introduce slightly more complexity. You might encounter 45-degree angles, half-square triangles, or patterns that require more precise piecing. These patterns reward accuracy but remain achievable with practice.
Advanced patterns use complex angles, curved seams, or intricate layouts. They demand precision and patience but produce stunning visual results.
The best approach is to start with a pattern that feels slightly easier than you think you're capable of. Success builds confidence. Your next project can be more ambitious.
Many Moda Jelly Roll patterns are available free online or in quilting books. Some are designed specifically for jelly rolls, accounting for the 2.5 inch strip width.
Jelly Roll Quilt for Beginners: Your First Project
Selecting Your First Jelly Roll
Your first jelly roll choice matters. Pick something that excites you visually but doesn't intimidate you.
Look for collections with clear colour schemes. If all the fabrics in the roll work together harmoniously, your finished quilt will look polished even if your piecing isn't perfect. Collections like the To Be Jolly by One Canoe Two feature coordinated colours that work beautifully together.
Consider scale and contrast. Some collections feature large, bold prints. Others use smaller, busier patterns. Large prints are more forgiving; slight imperfections in piecing are less noticeable. Busy prints hide mistakes better than solid colours.
Colour preference matters too. Choose colours that make you happy. You'll spend hours working with this fabric. If you love warm tones, pick a collection featuring reds, oranges, and golds. If you prefer cool tones, choose blues, purples, and greens.
Avoid overthinking this decision. Your first quilt is a learning project. It won't be perfect, and that's fine. What matters is finishing it and building your skills.
Step-by-Step Beginner Quilt Construction
Step 1: Gather Your Supplies (Time: 15 minutes)
You'll need:
To Be Jolly by One Canoe Two | Moda Jelly Roll →
- Your Moda Jelly Roll
- Rotary cutter and cutting mat
- Quilting ruler (6 x 24 inches is standard)
- Sewing machine with cotton thread
- Scissors
- Iron and ironing board
- Wadding (size depends on your quilt dimensions)
- Backing fabric
- Binding fabric
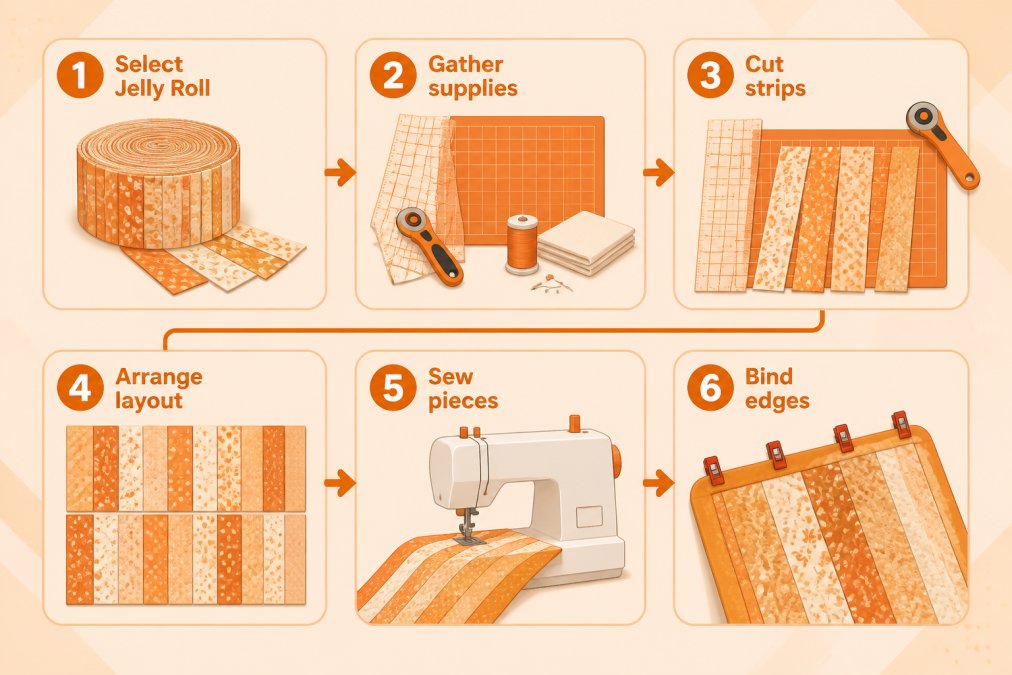
Step 2: Plan Your Layout (Time: 20 minutes)
Decide how many strips you'll use and how you'll arrange them. A simple approach: use all 40 strips sewn end-to-end into one long strip set, then cut that into blocks and reassemble.
Alternatively, sew strips into groups of four or five, creating smaller strip sets. Cut these into squares or rectangles, then arrange them in a grid pattern.
Sketch your plan on paper. This prevents mistakes and gives you a roadmap to follow.
Step 3: Sew Your Strips (Time: 1-2 hours)
Sew strips together using a 0.25 inch seam allowance. Chain-piece to save time: sew one strip to another, then feed the next pair through without cutting the thread between them.
Press seams to one side as you go. Consistent pressing prevents puckering and ensures your blocks lie flat.
Step 4: Cut Your Blocks (Time: 30 minutes)
Once your strips are sewn together, use your rotary cutter and ruler to cut them into blocks. If you've sewn 40 strips end-to-end, cut the long strip set into 2.5 inch squares.
Square up each block using your ruler. Trim away excess fabric to ensure all blocks are exactly the same size.
Step 5: Arrange and Sew Blocks (Time: 1-2 hours)
Lay out your blocks on a design wall, floor, or bed. Arrange them in a pattern that pleases you. A simple grid works beautifully. Rotate some blocks to create visual interest.
Once you're happy with the arrangement, sew blocks together row by row. Press each row. Then sew rows together to create your quilt top.
Step 6: Add Wadding and Backing (Time: 1 hour)
Layer your quilt top, batting, and backing fabric. Smooth out wrinkles as you go.
Quilt the layers together using straight lines, stippling, or free-motion quilting. Even simple quilting holds the layers together and adds texture.
Step 7: Bind the Edges (Time: 1-2 hours)
Trim the excess batting and backing. Cut binding strips, sew them together to create one long strip, press, and attach to the quilt using a 0.25 inch seam allowance.
Fold the binding to the back of the quilt and hand-stitch it down using a whip stitch.
Common Mistakes When Working with Jelly Rolls
Inconsistent seam allowances are the biggest culprit. Even a 0.125 inch variation compounds across 40 strips. By the time you've sewn them all together, your strip set is noticeably skewed.
Pressing seams the wrong direction causes puckering. Always press to one side, not open. This keeps fabric grain stable and prevents distortion.
Not squaring up blocks leads to a wonky quilt. After cutting blocks, use your ruler to trim each one to exact size. This extra step takes minutes but dramatically improves your finished quilt.
Choosing overly complex patterns for your first project sets you up for frustration. A simple strip quilt or rail fence pattern teaches you fundamentals without overwhelming you. Save the complex designs for project number three or four.
Mixing strip widths creates sizing problems. If you accidentally include a 2 inch strip among your 2.5 inch strips, it throws off your block dimensions. Sort strips before you start sewing.
Ignoring fabric grain causes stretching and distortion. Always sew with the grain running the same direction. This prevents fabric from pulling during piecing.
Skipping the design phase means you start sewing without a plan. Take 20 minutes to sketch your layout. It prevents wasted time and rework.
Moda Jelly Rolls transform quilting from overwhelming to achievable. Whether you're making your first quilt or your fiftieth, a jelly roll removes the hardest part: choosing fabrics that work together.
At Fabric Mouse, we stock a range of Moda Jelly Roll collections to suit every taste and skill level. Start with a collection that excites you visually. Follow the steps above. Your first quilt will teach you more than any tutorial could. Contact us to find the perfect jelly roll for your next project.
Frequently Asked Questions
What exactly is a Moda Jelly Roll?
A Moda Jelly Roll is a pre-cut fabric bundle containing 40 strips of 100% cotton fabric, each measuring 2.5 inches wide and 44 inches long. The strips feature coordinating colours and designs from Moda's range of collections, combining classic, traditional, and modern styles. This pre-cut format eliminates the need to measure and cut fabric yourself, making it ideal for quilting, patchwork, cushions, and other craft projects.
How many 2.5 inch fabric strips for quilting come in a standard Moda Jelly Roll?
A standard Moda Jelly Roll contains 40 strips of 100% cotton fabric. Each strip measures exactly 2.5 inches wide by 44 inches long. Some variations, such as Junior Jelly Rolls, contain 20 strips instead. The consistent sizing means you can plan projects knowing precisely how much fabric you have available, making calculations straightforward for beginners and experienced quilters alike.
Are Moda Jelly Rolls suitable for complete beginners?
Yes, Moda Jelly Rolls are excellent for beginners because the fabric is pre-cut to consistent sizes, eliminating measurement errors. The coordinating colours and designs work well together without requiring advanced colour-matching skills. Many beginner-friendly quilt patterns are specifically designed for jelly roll strips. Starting with a junior jelly roll or a simpler pattern helps build confidence before progressing to more complex designs.
What Moda Jelly Roll quilt patterns work best for first-time quilters?
Beginner-friendly patterns include strip piecing quilts, which simply involve sewing strips together in sequence, and simple rail fence designs. Look for patterns that avoid complex piecing, curved seams, or extensive colour-matching requirements. Many free patterns online are specifically labelled 'jelly roll friendly' and include step-by-step instructions tailored to pre-cut fabric bundles.
Guess How Much I Love You Fabric: Projects & Ideas
Moda French General Fabric: A Guide for UK Sewers
Related Posts

Moda French General Fabric: A Guide for UK Sewers

Guess How Much I Love You Fabric: Projects & Ideas

Lord of the Rings Fabric: A Guide for Quilters

How to Thread a Sewing Machine Correctly

Is a Heavy Duty Sewing Machine Worth It?

Best Fabric Shops in North Yorkshire: 2026 Guide
