

How to Adjust Sewing Patterns for a Full Bust
Quick Summary
To adjust a sewing pattern for a full bust, locate the bust point, then slash through it and spread the pattern to add width, and add length only if the bodice rides up. Test the change on a toile before cutting your final fabric. Using the how to adjust sewing patterns for a full bust method gives a better fit without enlarging the whole bodice.
- Measure your high bust and full bust, then choose the pattern size that matches your high bust.
- Mark the bust point about 2.5 to 4 cm from the dart point, following the pattern's guide.
- Use the slash-and-spread method, stopping just short of the bust point so the paper stays joined.
- Add length above the bust point only if the bodice rides up at the front.
- Always check the adjustment on a toile before cutting your final fabric.
Table of Contents
- What a Full Bust Adjustment Does and When You Need One
- How to Choose a Sewing Pattern Size for a Full Bust
- Finding the Bust Point and Marking Your Pattern
- Full Bust Adjustment for Beginners: Slash, Spread and Redraw
- Adding Length as Well as Width Over the Bust
- Full Bust Adjustment on a Dartless Bodice
- Full Bust Adjustment on a Princess Seam
- Testing the Fit With a Toile and Troubleshooting Problems
- Booking Help With Your Next Pattern Fitting
- Frequently Asked Questions
How to Adjust Sewing Patterns for a Full Bust
Last Updated: November 11, 2026
What a Full Bust Adjustment Does and When You Need One
Learning how to adjust sewing patterns for a full bust starts with understanding what the change does: it is a pattern change that gives extra room over the bust without making the whole bodice bigger. Many sewists love a pattern's style but find the bust too tight or the bodice pulling sideways across the chest. A full bust adjustment fixes that problem in one place.
Some standard patterns are drafted for a smaller bust than many people have. You may need one if the bodice gapes at the neckline, pulls across the front, or sits too short above the bust.
- The bodice pulls or strains across the bust
- Side seams sit towards the front instead of hanging straight
- Darts point to the wrong place or fall short of the bust point
- The bodice gapes at the armhole or neckline
Not every pattern needs the same change. Check the fit with a toile before you cut your final fabric. If your toile gapes at the armhole after a bust adjustment, practical fixes for gaping armholes in dresses cover the most common causes and solutions.
How to Choose a Sewing Pattern Size for a Full Bust
Choosing the right size is the first step. Many sewists pick a size from their high-bust measurement and then adjust the bust. That approach works well for most patterns.
Measure your high bust (just above the bust) and your full bust (the fullest part). Compare these with the pattern's size chart. If your full bust fits one size but your waist or hip fits another, you can grade between sizes.
Start with the size that matches your high bust measurement, then make any full bust adjustment on top of that.
Pattern sizes vary between brands. Always check the chart on the pattern envelope rather than trusting your usual size.
Finding the Bust Point and Marking Your Pattern
The bust point, sometimes called the apex, is the fullest part of the bust. Locate it on the pattern before you make any cuts.
To mark it:
- Place the pattern piece flat on a table.
- Find the dart point that points towards the bust.
- Mark a dot about 2.5 to 4 cm from the dart point, following the pattern's guide.
- Draw a line from the shoulder through the bust point to the hem.
Your wearer's bust point and the pattern's bust point should line up. If you are unsure, take a measurement from the shoulder to the bust point on your body and compare it with the pattern.
Full Bust Adjustment for Beginners: Slash, Spread and Redraw
The slash-and-spread method is the most common full bust adjustment. It is simple, and it keeps the shape of the pattern.
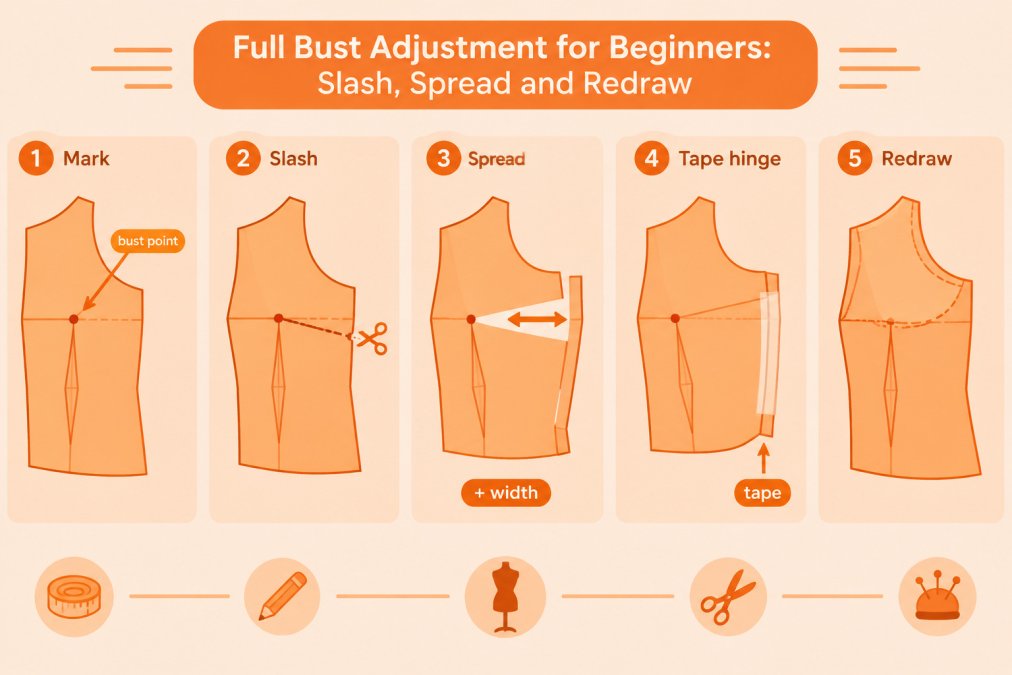
Here is how to do it:
- Draw a horizontal line from the bust point to the side seam.
- Draw a vertical line from the bust point to the hem.
- Cut along both lines, stopping short of the bust point so the pattern stays connected.
- Spread the pattern apart by the amount you need.
- Tape the pieces to paper and redraw the outline smoothly.
Watch out: spreading the pattern too far can make the side seam sit at the wrong angle, so check the bust point against your measurement before taping.
Adding Length as Well as Width Over the Bust
Some people need extra length as well as width. This is common when the bodice rides up at the front. You can add length by slashing horizontally above the bust point and spreading the pattern vertically.
Adjust length only when the bodice feels short.
- Add width first, since it is the most common need
- Add length only if the bodice rides up at the front
- Check both adjustments on a toile
Full Bust Adjustment on a Dartless Bodice
A dartless bodice has no bust dart to spread, so the extra room has to come from somewhere else in the pattern. Most dartless fronts are designed with ease distributed across the front panel, so the adjustment is about relocating that fullness rather than creating a new shape. This method works well on knit tops, loose blouses and gathered or pleated fronts, where the fabric can absorb a small change in the seam lines.
Before you start, decide how much extra width you need. Measure the difference between your full bust and the pattern's full bust at the bust line, then halve it because the front panel is cut once on the fold. This figure is the amount you will spread in total.
The steps are:
- Mark the bust point on the front panel, using the same guide as for a darted bodice. On a dartless front, it may sit in the middle of the panel rather than near a dart tip.
- Draw a line from the side seam to the bust point, and a second line from the bust point down to the hem.
- Cut along the side-seam line, stopping just short of the bust point so the paper stays joined.
- Spread the pattern at the side seam by the amount calculated above.
- Tape the pattern to a sheet of paper and redraw the side seam so it runs smoothly from the armhole to the hem.
- Check the new side seam length against the back panel. If the side seams no longer match, even out the difference at the hem so the two pieces are the same length.
Because there is no dart to absorb the change, the extra width will show up as ease across the front. On a knit this usually sits comfortably, but on a woven fabric it can create a small blouse-like bulge across the chest. If you are sewing a woven, consider taking a small horizontal tuck or a gather at the neckline to control it.
Watch out: spreading the side seam too far can flare the lower bodice, so check the hem width after taping and compare it with the pattern's original hem measurement.
The table below sums up the main steps for a dartless bodice, so you can check the sequence before you start.
| Step | What to do | Note |
|---|---|---|
| 1 | Mark the bust point on the front panel | May sit mid-panel, not near a dart |
| 2 | Draw lines from side seam and hem to bust point | Stop just short of the bust point |
| 3 | Cut along the side-seam line | Keep the paper joined |
| 4 | Spread the side seam by the calculated amount | Halve the difference; panel is cut on the fold |
| 5 | Tape and redraw the side seam | Run it smoothly from armhole to hem |
| 6 | Check side seam lengths against the back | Even out any difference at the hem |
Full Bust Adjustment on a Princess Seam
A princess seam runs from shoulder to hem without a dart. You adjust the bust by slashing through the seam line that passes the bust point.
Slash along the princess seam from the armhole towards the bust point, then spread the pattern at the hem edge. This keeps the seam line smooth and avoids a bulge across the chest.
Princess seams suit many body shapes, so they are a good option if you want a fitted look without darts.
Testing the Fit With a Toile and Troubleshooting Problems
A toile, or test garment, is the only reliable way to check a full bust adjustment before cutting your final fabric. Calico or an inexpensive woven cotton works well, and it is worth making the toile in the same construction as the final garment so the fit reflects how the fabric will behave.
When you try the toile on, check these points in order: the bust point position, the side seams, the armhole, the neckline and the hem. Each area tends to show a different kind of problem, and working through them in sequence makes it easier to find the cause.
Use this guide to match symptoms to likely causes:
- Pulling across the bust, with horizontal wrinkles radiating from the bust point: The width added is probably too small. Add a little more at the side seam and recheck. If the pulling persists, the bust point may sit too low.
- Gaping at the neckline or armhole, with fabric standing away from the chest: The bust may have been spread too far, or the shoulder seam may be too long. Reduce the spread slightly, or take a small dart at the shoulder to bring the fabric closer.
- Dart point sitting below or to the side of the bust point: The bust point on the pattern does not match your bust point. Move the dart so it points at the fullest part of the bust, and redraw the dart legs.
- Excess length at the hem, with the front riding lower than the back: Length may have been added where it is not needed. Remove the vertical addition, or take a horizontal tuck above the bust to shorten the front without losing width.
- Front hem rising at the centre: The bodice is probably too short above the bust. Add length above the bust point, not below it, and check that the centre front still sits straight.
- Side seam sitting toward the front: The width is correct but the side seam has not been redrawn to follow the body. Smooth the seam so it runs straight down from the underarm.
When you make a change, mark it on the toile with a pencil and transfer it to the paper pattern before you cut again. Small changes of a few millimetres often make a noticeable difference, so test one correction at a time. Changing several things together makes it hard to tell which one worked.
Watch out: a toile can look right on a dress form but feel tight once you move. Check the bodice with your arms raised and forward, and sit down to see whether the front pulls.
Booking Help With Your Next Pattern Fitting
Adjusting a pattern is easier with someone to check your work. If you would like personal help choosing a machine for your dressmaking, or want to talk through a fit problem, contact Fabric Mouse. Before a fitting, you can see fabrics and equipment in person at our shop and showroom in Thirsk. We can also arrange individual lessons with Stuart by arrangement. Please contact us before travelling so we can confirm what is available.
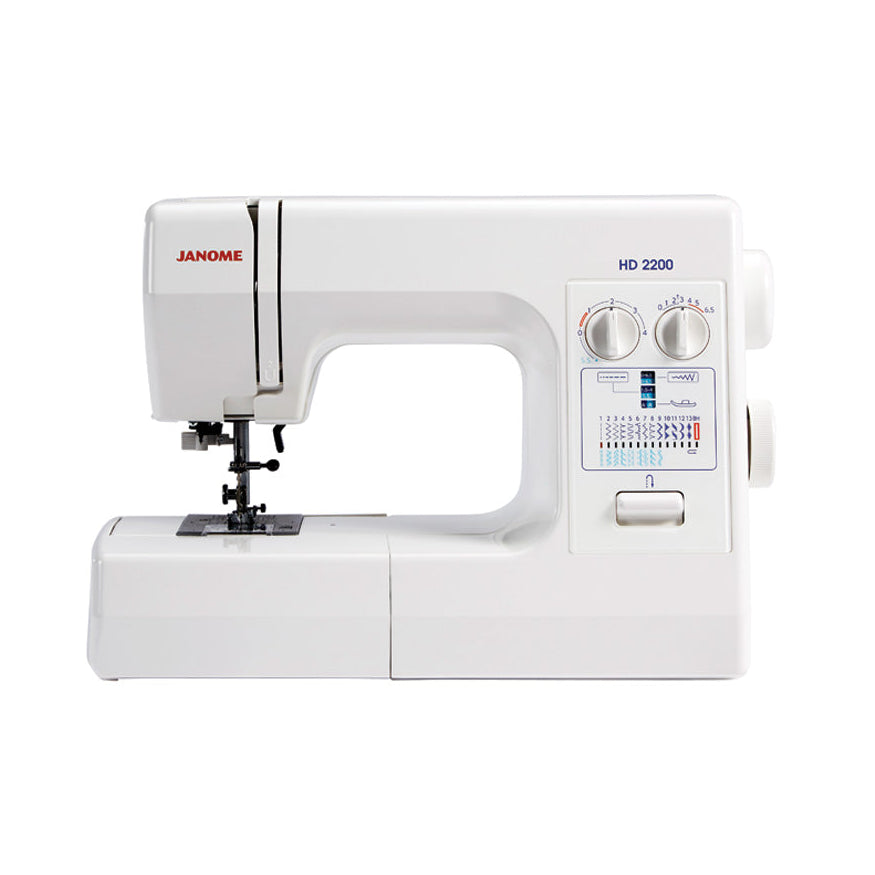
For machines suited to dressmaking, the Janome HD2200 Mechanical Sewing Machine has manual presser-foot pressure adjustment. You can find it on our sewing machines listing.
Many sewists find that a full bust adjustment becomes routine after a few attempts. Start with one pattern, take your time with the toile, and build from there.
Frequently Asked Questions
What is a full bust adjustment in sewing?
A full bust adjustment, usually shortened to FBA, is a change to a sewing pattern that gives extra room over the bust without making the whole bodice bigger. You slash the pattern through the bust point, spread the pieces apart to add width and, if needed, length, then redraw the lines so the shoulders, neckline and side seams stay in their original positions. It is the standard way to fit a bodice to a fuller bust while keeping the pattern balanced.
How do I know if I need a full bust adjustment?
Compare your high-bust and full-bust measurements with the chart for the pattern. If your full bust is larger than the pattern's bust measurement for your size, or if your cup size is larger than the cup the pattern is drafted for, an FBA is likely to help. Make a test bodice or toile first. Pulling across the bust, gaping at the armhole or a bodice that rides up at the centre front are common signs that the bust needs more room.
Can I do a full bust adjustment on a dartless pattern?
Yes. A dartless bodice still needs the extra fabric to sit over the bust, so the adjustment is made through the slash line in a different place. Instead of closing a dart, you add width along the slash line, usually from the armhole or side seam, and blend the new edge into the original seam. Check the pattern carefully before cutting, as the balance of the front and back can change.
How do I check whether my full bust adjustment has worked?
Sew a toile or a test bodice from inexpensive fabric before cutting your final piece. Check that the bust sits at the right height, the side seams hang straight, the centre front lies flat against the body and the shoulder seams stay in place. Small pulling lines running from the bust point usually mean more width is needed, while excess fabric above the bust can mean the length was overdone.

Related Posts

How to Calculate Fabric Yardage for Beginners

How to Clean and Oil Your Embroidery Machine Properly

How to Sew with Cotton Jersey Fabric: A Practical Guide

Choosing Embroidery Software for Beginners: A Practical Guide

How to Troubleshoot Sewing Machine Tension Problems

What Happens When a Sewing Machine Needle Breaks
