

How to Fix Gaping Armholes in Dresses: 7 Methods
Table of Contents
- Why Armholes Gap: Understanding the Problem
- How to Sew a Dart at an Armhole
- Armhole Gaping Pattern Adjustment Techniques
- How to Fix Gaping Armholes in a Finished Dress
- How to Fix Gaping Armholes in a Sleeveless Dress
- Seam Binding and Facing Adjustments
- Tacking and Pinning Techniques Before Sewing
- Common Mistakes to Avoid When Fixing Armholes
- Frequently Asked Questions
Last Updated: October 17, 2026
Why Armholes Gap: Understanding the Problem
Gaping armholes are one of the most frustrating fit issues in dressmaking. When the fabric pulls away from your body at the underarm, it creates an unflattering silhouette and compromises the entire garment's appearance. The problem typically stems from one of three causes: the armhole is cut too large for your frame, the sleeve cap sits too high, or the garment lacks sufficient ease in the right places.
Understanding why your dress gaps at the armhole is the first step toward fixing it. Some gaps appear immediately after construction, whilst others develop over time as fabric relaxes or your body shifts slightly. The good news is that fixing gaping armholes doesn't always require starting over, many solutions work beautifully on finished garments.
How to Sew a Dart at an Armhole
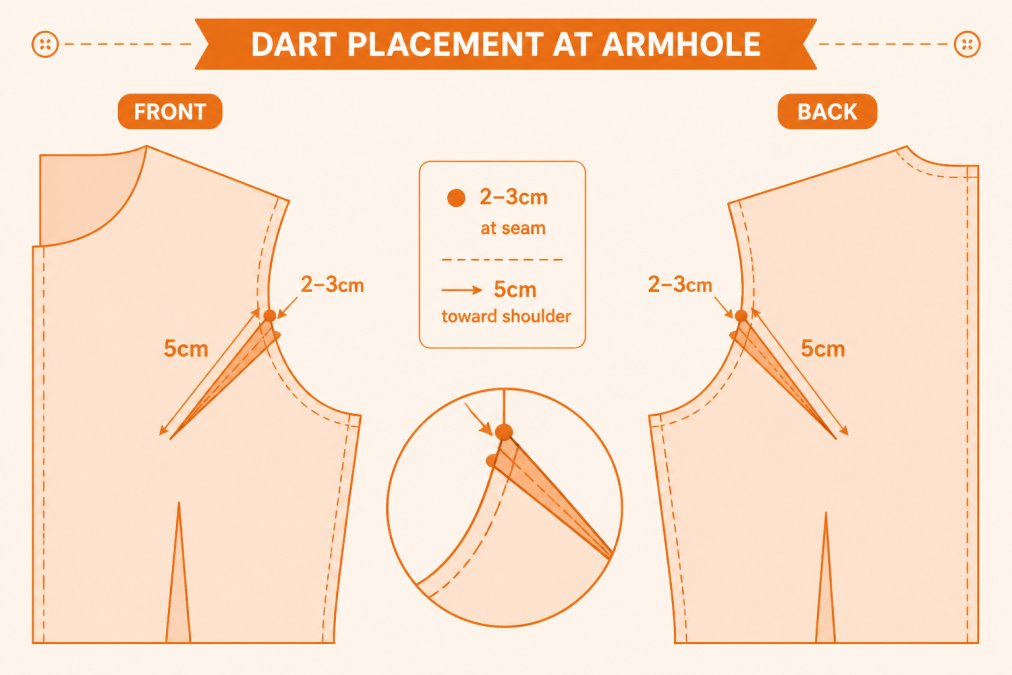
Sewing a dart at the armhole is one of the most effective permanent solutions for fixing gaping armholes in dresses. A dart removes excess fabric and reshapes the armhole curve to match your body more precisely. This method works particularly well if you have narrow shoulders or a petite frame.
Begin by trying on the dress and pinching the excess fabric at the armhole to determine dart depth. Mark the deepest point with tailor's chalk or a fabric pen. The dart should taper from approximately 2-3 cm at the underarm seam to a point about 5 cm up towards the shoulder. Use quality pins like the Hemline Plastic Head Pins H678 to hold the dart in place whilst you test the fit. These pins hold fabric firmly without slipping, making them ideal for precision work.

Once you're satisfied with the fit, stitch the dart with a matching thread, starting from the seam and tapering smoothly to the point. Keep stitches small and consistent, uneven stitching creates puckers. Press the dart to one side after sewing. If the dart is deeper than 1.5 cm, consider adding a second smaller dart on the opposite side of the armhole for balance.
Armhole Gaping Pattern Adjustment Techniques
Pattern adjustment is the most permanent solution for armhole gaping, especially if you plan to sew similar styles repeatedly. If you've identified that your body consistently requires a smaller armhole, adjusting the pattern itself saves time on future projects.
Reduce the armhole circumference by moving the side seam inward by 0.5-1 cm at the underarm. This small shift creates a noticeably tighter armhole without affecting sleeve length or overall silhouette. You can also raise the armhole depth slightly, moving the underarm point up by 0.5 cm reduces excess fabric considerably.
For pattern adjustments, trace your original pattern onto fresh paper before making changes. Test the adjusted pattern on a muslin toile first. Cut a test garment in inexpensive fabric, sew it together, and try it on. This prevents wasting premium fabric on an untested adjustment.
Many sewers find that combining two minor adjustments works better than one large change. Reduce the armhole width by 0.5 cm and raise the depth by 0.3 cm, then test. Small, incremental changes are easier to evaluate than dramatic alterations.
How to Fix Gaping Armholes in a Finished Dress
Fixing gaping armholes in a finished dress requires a different approach than adjusting during construction. You're working within the constraints of an already-assembled garment, so your options focus on reshaping rather than resizing.
The most practical method is taking in the side seams slightly. If the dress fits well everywhere except the armhole, unpick the side seam from the hem to approximately 5 cm below the armhole. Taper the seam inward, removing 0.5-1 cm at the underarm and blending smoothly back to the original seam line by the time you reach the dress body. This creates a more fitted underarm without affecting the overall garment shape.
Alternatively, add small darts at the back armhole, just inside the seam allowance. These internal darts are invisible from the outside but effectively remove excess fabric. Stitch them from the inside, then press carefully so they don't create visible ridges on the finished side.
For garments with significant gaping, consider a combination approach: take in the side seam slightly and add a small dart at the back shoulder blade. This distributes the adjustment across two points rather than concentrating it in one spot, creating a smoother result.
How to Fix Gaping Armholes in a Sleeveless Dress
Sleeveless dresses present a unique challenge for fixing gaping armholes, because the armhole edge is visible and any adjustment must maintain a clean, professional finish. The facing or binding at the armhole edge must be adjusted along with the seam itself.
Begin by unpicking the armhole facing or binding carefully. Once removed, you can access the armhole seam and make your adjustments, typically taking in the side seam by 0.5-1 cm at the underarm. After adjusting the seam, you'll need to replace the facing or binding to match the new armhole shape.
If the original facing is still in good condition, you may be able to reuse it, though you'll likely need to trim it slightly to match the new armhole circumference. Alternatively, cut new facing from matching or complementary fabric. Pin the new facing to the adjusted armhole, ensuring it lies flat without puckering, then stitch it in place using a narrow seam allowance.
For sleeveless dresses with bound armholes, bias binding works beautifully. Measure the new armhole circumference carefully and cut or purchase binding to match. Apply it using the same technique you'd use on a new garment, working carefully around the curves.
Seam Binding and Facing Adjustments
Seam binding and facing adjustments address armhole gaping by stabilising the armhole edge and, in some cases, subtly reshaping it. These techniques are particularly effective for woven fabrics that tend to stretch or shift over time.
Add lightweight seam binding to the armhole seam allowance if the fabric shows signs of stretching. This prevents further distortion and can slightly reduce the effective armhole opening. Fold the seam binding in half lengthwise and stitch it to the seam allowance using a narrow zigzag stitch or a overlocker if you have one. The binding prevents fraying and provides stability without adding bulk.
For garments with a facing, check that the facing is sewn securely and pressed properly. A loose or poorly pressed facing can appear to create gapping even when the armhole itself fits correctly. Understitch the facing (stitch it to the seam allowance rather than the garment fabric) to encourage it to roll toward the inside and stay put.
If the facing is old or damaged, replacing it is often simpler than repairing it. Remove the original facing, trim the armhole seam allowance to a consistent width, and apply new facing using the same pattern pieces. This gives you an opportunity to adjust the facing width slightly if needed, a marginally narrower facing can help a slightly loose armhole sit better.
Tacking and Pinning Techniques Before Sewing
Proper tacking and pinning prevents mistakes and ensures your adjustments fit correctly before you commit to permanent stitching. This step is essential when fixing gaping armholes because trial and error at the fitting stage is far less costly than unpicking and re-sewing.
Use quality pins to hold adjustments in place. The Hemline Economy Pins H670 are excellent for this purpose, they hold fabric firmly without slipping and come in a handy reusable container. Place pins perpendicular to the seam, spacing them about 2-3 cm apart. This prevents fabric from shifting whilst you try on the garment.

Hand-tack adjustments using a long running stitch in a contrasting thread colour. Tacking stitches are temporary and easy to remove, but they hold the fabric securely enough to assess fit. Tack along the entire adjusted seam, not just the armhole area, this prevents the rest of the seam from shifting whilst you're focused on the armhole.
Try on the garment carefully with tacking stitches in place. Move your arms through a full range of motion, reach overhead, across your body, and behind your back. The armhole should feel comfortable and not pull or gap. If the fit isn't quite right, remove the tacking and re-pin, making smaller adjustments as needed.
Common Mistakes to Avoid When Fixing Armholes
Understanding what goes wrong helps you avoid costly errors when fixing gaping armholes. The most common mistake is removing too much fabric too quickly. Sewers often panic about visible gapping and make dramatic adjustments in a single step. This overcorrection creates a tight, uncomfortable armhole that restricts movement.
Another frequent error is failing to blend adjustments smoothly. If you take in the side seam by 1.5 cm at the underarm but don't taper the adjustment back to the original seam line, you create a sharp angle rather than a smooth curve. This produces an awkward fit and visible puckering.
Many sewers also neglect to test adjustments before making them permanent. Tacking takes only a few extra minutes but prevents hours of unpicking and re-sewing. Always try on a garment with tacking stitches in place before committing to permanent seams.
Choosing the wrong adjustment method for your specific problem is another pitfall. If the dress fits perfectly everywhere except the armhole, a simple dart or side seam adjustment is sufficient. If the entire garment is too loose, you may need a more comprehensive fitting adjustment that addresses multiple areas. Identifying the real problem prevents wasted effort on ineffective solutions.
Finally, many sewers underestimate the importance of pressing. A properly pressed dart or seam lies flat and blends smoothly into the garment. Skipping this step leaves adjustments looking amateurish and creates visible ridges.
Gaping armholes are frustrating, but they're entirely fixable with the right techniques and a bit of patience. Whether you adjust the pattern, sew darts, take in seams, or use stabilising methods, the key is working incrementally and testing thoroughly before committing to permanent stitching. Fabric Mouse stocks the quality pins and thread you need to execute these adjustments beautifully, from Hemline Plastic Head Pins H678 for secure pinning to Prym plastic headed pins for precision work. With the right tools and techniques, you'll transform a poorly fitting dress into a garment that fits your body perfectly.

Frequently Asked Questions
Why do armholes gape on a dress?
Armholes gape when the armhole opening is too large for your arm circumference or shoulder width. This happens due to pattern sizing mismatches, incorrect seam allowances during construction, or insufficient ease built into the original pattern. Gaping can also occur if the armhole curve doesn't match your body's natural shoulder slope. The gap typically appears at the back or underarm area where fabric pulls away from your body.
Can you fix a gaping armhole without unpicking the whole dress?
Yes. For finished dresses, you can tack the excess fabric from inside using ladder stitch, add darts at the underarm seam without removing the sleeve, or adjust the seam binding. For sleeveless dresses, you can add elastic to the binding or tack the armhole seam inward. These methods avoid unpicking the entire garment and work best when the gap is 1-2 centimetres. Larger gaps may require more extensive alterations.
How do you sew a dart at an armhole to reduce gaping?
Mark a vertical dart 5-7 centimetres long at the underarm seam, centred where the gap appears most. Fold the dart with wrong sides together and stitch from the widest point toward the point, tapering to nothing. Press the dart toward the back. Start with a shallow dart (0.6 centimetres deep) and try the dress on before deepening it. Use quality pins like Hemline Plastic Head Pins H678 to hold the dart in place whilst stitching, ensuring precise positioning.
What's the difference between fixing a finished dress and adjusting during pattern making?
Pattern adjustments made before cutting prevent gaping by increasing armhole depth, reducing armhole width, or adding extra ease to the pattern pieces. Fixing a finished dress requires working with an already-sewn garment, limiting options to internal darts, tacking, or binding adjustments. Pattern adjustments offer more control and better results, but finished-dress fixes are practical when you've already completed the garment or purchased it ready-made.
How to Sew a Professional Tailored Collar
How to Grade Sewing Patterns for Custom Fit
Related Posts

How to Grade Sewing Patterns for Custom Fit

How to Sew a Professional Tailored Collar

What Is the Purpose of a Walking Foot?

Sewing Machine Needle Types Explained

Lightweight Sewing Machine: A 2026 Review

Doctor Who Fabric Guide: Types, Prints & Projects
