

How to Sew a Professional Tailored Collar
Table of Contents
- What You'll Need Before Starting
- How to Sew a Professional Tailored Collar: The Basics
- Understanding Tailored Collar Interfacing
- How to Sew Collar Points Neatly
- How to Press a Jacket Collar to Perfection
- How to Sew a Jacket Collar and Lapel Together
- Common Mistakes to Avoid
- Frequently Asked Questions
Last Updated: 15 October 2026
What You'll Need Before Starting
Before you tackle how to sew a professional tailored collar, gather the right tools and materials. A sharp pair of scissors, quality thread, and precision needles make all the difference. We recommend the Hemline h100.90 universal sewing machine needles size 90/14 for tailored work, they handle multiple fabric layers smoothly.
You'll also need interfacing, a pressing ham or roll, and a pressing cloth. A seam ripper saves time when corrections are needed. The Hemline Basic Sewing Kit includes essential tools like a point turner and measuring tape that speed up collar work considerably.

Quality thread matters more than most sewers realise. The Madeira Aerofil 400m Sewing Machine Thread gives you smooth, consistent stitching across all fabric weights, essential for visible collar seams.

Key supplies for tailored collar work:
- Universal needles (size 90/14 for medium-weight fabrics)
- High-quality thread in matching colours
- Interfacing (fusible or sew-in, depending on your fabric)
- Pressing equipment (ham, cloth, steam iron)
- Sharp scissors and a seam ripper
- Pattern pieces and pattern weights
How to Sew a Professional Tailored Collar: The Basics
A professional tailored collar starts with precision from the very beginning. This is where most home sewers lose control of the finished shape. The secret isn't complicated, it's about cutting accurately and maintaining consistent seam allowances throughout.

Preparing your fabric and pattern pieces
Lay out your pattern pieces on the fabric grain. Collar pieces must be cut on grain to hang properly. Pin the pattern pieces securely and check grain lines before cutting.
Press your fabric before cutting. Wrinkles create uneven seams. A damp pressing cloth removes most creases without damaging delicate fabrics.
Mark your seam allowances lightly with tailor's chalk or a fabric pencil. These marks guide your stitching line and keep seams consistent. Mark both the outer edge and the roll line (where the collar folds).
Cutting with precision
Cut slowly and deliberately. A single wobble in your scissors changes the collar's final shape. Use sharp fabric scissors, blunt ones crush threads instead of cutting cleanly.
Cut two collar pieces (upper and under collar). Many tailors cut the under collar slightly smaller, about 1.5mm less, so it sits hidden inside the fold. This prevents the under collar from showing at the edges.
Label your pieces immediately. Mark which is upper and which is under collar. Add grain line arrows to each piece. This prevents confusion later when you're assembling.
Understanding Tailored Collar Interfacing
Interfacing gives a collar its structure and prevents it from drooping. The wrong interfacing choice undermines everything else you do. Get this right and your collar will hold its shape for years.
Why interfacing matters for structure
The collar seams experience constant stress from wear and movement. Without proper interfacing, the fabric stretches and the collar loses its crisp shape. Interfacing prevents this by adding stability to the fabric.
Choose fusible or sew-in interfacing based on your fabric weight. Light fabrics need light interfacing. Heavy fabrics need firm support. Medium-weight fabrics work with either type.
The interfacing goes on the under collar piece. This keeps the upper collar smooth and visible. It also creates a slight stiffness that helps the collar roll correctly.
Applying interfacing correctly
Cut your interfacing slightly smaller than the collar piece, about 6mm inside the seam allowance. This prevents bulk at the edges where the collar meets the jacket.
For fusible interfacing, follow the manufacturer's instructions precisely. Too much heat damages delicate fabrics. Too little heat means the interfacing won't adhere properly.
Press from the wrong side first. Then flip and press from the right side to ensure full contact. A pressing cloth prevents shine on delicate fabrics.
For sew-in interfacing, baste it to the under collar piece with long running stitches. Remove these basting stitches after you've sewn the outer seams.
How to Sew Collar Points Neatly
Sharp, professional collar points separate a tailored collar from an amateur one. The technique is straightforward but requires care at every step.
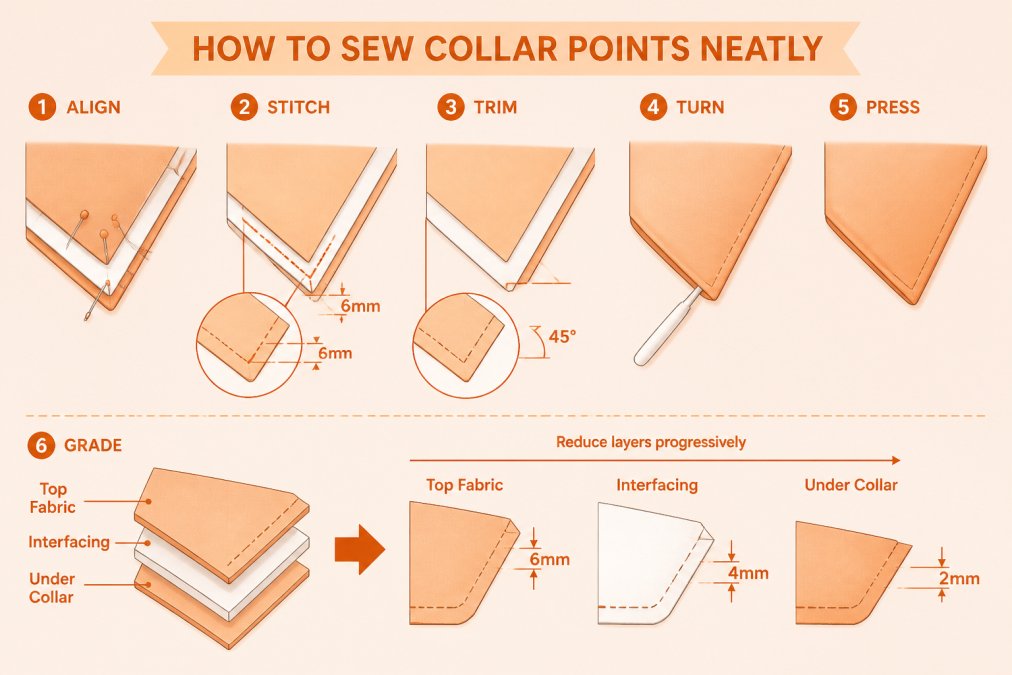
Stitching the collar seams
Place the upper and under collar pieces with right sides together. Pin along the outer edges, leaving the neckline edge open. Use fine pins placed perpendicular to the seam line.
Start stitching at the neckline. Stitch along the outer edges toward the first point. Slow down as you approach the point.
At the point itself, take one stitch across the point tip. This creates a sharp corner instead of a rounded one. Then angle your stitching back out toward the next edge.
Stitch with a short stitch length, about 2.0mm. Short stitches hold fabric layers firmly and create sharper corners. They also make seams easier to grade later.
Trimming and grading seams
Trim the seam allowance to 3mm after stitching. Scissors work better than a rotary cutter for this precision work. Cut carefully around the points without nicking your stitches.
Grade the seams by trimming each layer to a different width. Trim the under collar to 2mm. Trim the upper collar to 3mm. This prevents bulk when you turn the collar right-side out.
At the points, trim at a 45-degree angle. This removes excess fabric that would create lumps. Clip diagonally into the seam allowance at the corners without cutting through your stitches.
How to Press a Jacket Collar to Perfection
Pressing shapes the collar and sets the roll. Many sewers skip this step or rush through it. Proper pressing makes the difference between a floppy collar and one that holds its shape.
Turning and shaping techniques
Turn the collar right-side out through the neckline opening. Use a point turner to push out the corners gently. Don't force the point turner, you'll create holes in the fabric.
Roll the seam slightly toward the under collar. This hides the upper collar seam inside the fold. The upper collar should wrap slightly around the under collar.
Press the outer edges firmly with a steam iron. Use a pressing cloth to protect delicate fabrics. Press from the under collar side first, then flip and press the upper collar.
Hemline H100.80 Universal Sewing Machine Needles Size 80/12 →
Setting the roll with heat
The collar roll is the curved fold where the collar turns. This roll must be smooth and consistent. Pressing sets this shape permanently.
Place the collar on a pressing ham or roll. This curved tool shapes the collar to match the neckline curve. Position the collar so the roll line sits on the highest part of the ham.
Apply steam and pressure. Hold the iron in place for several seconds. The steam penetrates the fabric and the interfacing, allowing fibres to relax into the new shape.
Cool the collar completely before moving it. Hot fabric stretches easily. Cooling sets the shape in place.
Press the collar multiple times if needed. Each pressing reinforces the shape. Professional tailors often press collars three or four times during construction.
How to Sew a Jacket Collar and Lapel Together
Attaching the collar to the jacket requires precision alignment. The collar must sit evenly on both sides of the neckline. Any misalignment shows immediately.
Attaching the collar to the jacket
Pin the collar to the jacket neckline with the upper collar facing the jacket right side. Match the collar centre to the jacket centre back. Pin the ends to the lapel notches.
The collar should sit smoothly without puckers or gaps. Adjust pins until the fit is perfect. This takes patience but prevents problems later.
Stitch the collar to the neckline using a 6mm seam allowance. Use the same short stitch length you used for the collar seams. Stitch slowly and stop frequently to check alignment.
Trim and grade the neckline seam allowance after stitching. Trim the jacket seam to 2mm and the collar seam to 3mm. This reduces bulk where multiple layers meet.
Creating the lapel join
The lapel attaches over the collar base, encasing the raw neckline seam. This is where the collar and lapel become one unit. Precision here creates a professional finish.
Fold the lapel facing over the collar base. The facing should cover the neckline seam completely. Pin carefully so the fold line is straight and even.
Stitch the facing to the jacket body, catching all layers. Use a 6mm seam allowance. Stitch slowly around curves to maintain an even line.
Turn the facing to the inside and press firmly. The collar now sits under the lapel with no raw edges visible. This creates the clean, finished look of professional tailoring.
Common Mistakes to Avoid
Most collar problems come from rushing or skipping steps. Recognise these mistakes and you'll avoid them.
Cutting on the wrong grain. Fabric grain affects how pieces hang and stretch. Always check your pattern's grain line arrows before cutting.
Skipping interfacing or using the wrong weight. A collar without interfacing droops. Interfacing that's too soft doesn't provide support. Interfacing that's too stiff makes the collar stiff and uncomfortable.
Inconsistent seam allowances. Varying your seam width creates lumpy, uneven collars. Mark your seam allowance and follow it faithfully.
Pressing too little. Pressing isn't optional, it shapes the collar and sets the roll. Underpressed collars never look quite right.
Not grading seams. Bulk at the edges creates visible lumps. Grade every seam to reduce layers progressively.
Stitching too fast at corners. Speed causes wobbling stitches at points. Slow down and focus at corners and curves.
Turning the collar too forcefully. Aggressive turning creates holes and stretched fabric. Use a point turner gently and let the fabric guide you.
At Fabric Mouse, we see these mistakes regularly when customers ask for advice. The good news is they're all preventable with patience and attention to detail.
Tailored collars demand precision, but the process becomes natural with practice. Each step, from cutting to pressing, builds on the previous one. Skip any step and the final collar suffers.
Start with quality materials. The Hemline h100.90 universal sewing machine needles handle multiple fabric layers smoothly, and Madeira Aerofil thread gives you consistent stitching that holds its shape. Invest time in pressing properly, this is where amateur work becomes professional work. Your collar will reward the effort with years of crisp, polished wear.
Need guidance on selecting the right fabrics or equipment for your next tailoring project? Contact us at Fabric Mouse. Our team helps sewers choose materials and machines that match their skill level and ambitions.
Frequently Asked Questions
What interfacing should you use for a tailored collar?
Choose a woven or knit interfacing with enough body to support the collar shape without being too stiff. Medium-weight interfacing works best for most tailored collars. Apply it to the undercollar piece using fusible adhesive or hand-stitching. Test on scrap fabric first to ensure the interfacing doesn't pucker or distort your fashion fabric when fused.
How do you get crisp points on a tailored collar?
Trim seam allowances to 6mm at the collar points and grade the layers so the undercollar seam allowance is slightly shorter. Turn the collar right-side out gently, using a point turner to push out the corners fully without tearing the fabric. Press from the undercollar side first, then the fashion fabric side, using a pressing cloth to avoid shine. This creates sharp, defined points.
How do you stop a collar from puckering?
Puckering usually happens from too much tension during stitching or uneven fabric layers. Use quality needles like Hemline universal sewing machine needles, which provide precision and reduce tension issues. Stitch slowly around curves, use a slightly longer stitch length, and ensure interfacing is applied evenly. Press the collar carefully after stitching to set the seam and prevent puckers from setting permanently.
What is the difference between a shirt collar and a tailored collar?
A shirt collar is typically smaller, softer, and uses lighter interfacing for comfort against the neck. A tailored collar, used on jackets and coats, is structured and substantial with medium to heavy interfacing to hold its shape. Tailored collars have more pronounced points and roll, requiring precise pressing and careful attachment to the garment. The construction methods differ significantly due to these structural requirements.
Related Posts

What Is the Purpose of a Walking Foot?

Sewing Machine Needle Types Explained

Lightweight Sewing Machine: A 2026 Review

Doctor Who Fabric Guide: Types, Prints & Projects

Moda French General Fabric: A Guide for UK Sewers

Moda Jelly Rolls: A Complete Guide to Quilting
