

How to Calculate Fabric Yardage for Beginners
Last Updated: November 9, 2026
Quick Summary
Fabric yardage is the total length of fabric you need for a project. Measure the finished size, add seam and hem allowances, then divide by the fabric width to see how many pieces fit across. Convert the result to metres and round up.
- Measure the finished size of your item in centimetres first.
- Add seam allowances, usually 1.5cm on each edge.
- Check the usable fabric width on the product listing before calculating.
- Convert centimetres to metres by dividing by 100, then round up to the nearest half metre.
- Add 10 per cent for many small pieces, and allow extra for pattern repeats and shrinkage.
Table of Contents
- Why Fabric Yardage Matters Before You Buy
- Understanding Fabric Width and Why It Changes Everything
- Measuring Your Project: Step-by-Step
- Reading a Sewing Pattern's Yardage Chart
- Worked Examples: Cushions, Curtains and a Simple Quilt
- Allowing for Pattern Matching, Shrinkage and Cutting Waste
- How to Convert Yards to Metres Fabric Quantities
- Common Mistakes to Avoid When Estimating Fabric
- Ready to Buy: Checking Your Estimate Before You Order
- Frequently Asked Questions
Why Fabric Yardage Matters Before You Buy
Fabric yardage is the total length of fabric you need for a project. Work it out before you buy, and you avoid two costly problems: running short halfway through cutting, or ending up with a large offcut you never use. Many customers come into the shop with a rough idea of what they want to make, but no clear figure for how much fabric to buy. This guide walks you through the process step by step.
Fabric is sold in metres, so the figures in this guide use metres. Every calculation comes down to three things: the size of your project, the width of your fabric, and a small allowance for seams, hems and waste. Get those three right and your estimate will be close.
- Measure first: the finished size of the item you want to make
- Check the width: the usable width of the fabric you plan to buy
- Add allowances: seams, hems, pattern matching and cutting waste
Most beginners find it easier to overestimate slightly rather than buy too little, especially for quilts and curtains where a shortfall can mean a visible colour difference between batches.
Understanding Fabric Width and Why It Changes Everything
Fabric width decides how much fabric you need more than almost anything else. A piece 110cm wide can yield far more usable area than a piece 90cm wide, so the same project can need a very different length.
The width is usually printed on the bolt label or the product listing. Fabric widths vary, so always check the listing for the exact width of the item you are buying. Some fabrics are sold in half-metre or metre lengths, so also confirm the selling unit before you calculate.
Here is the key idea: you cut pieces across the width of the fabric. If your pieces are narrower than the fabric, you can fit several across a single width. If a piece is wider than the fabric, you may need to join fabric or buy more.
- Narrow fabric: fewer pieces fit across, so you usually need more length
- Wide fabric: more pieces fit across, so you usually need less length
- Pieces wider than the fabric: you may need to cut them along the length instead, which uses more fabric
Measuring Your Project: Step-by-Step
Follow these steps for any project. The example below works through a simple rectangle, which is the basis for most cushions, curtains and quilt pieces.
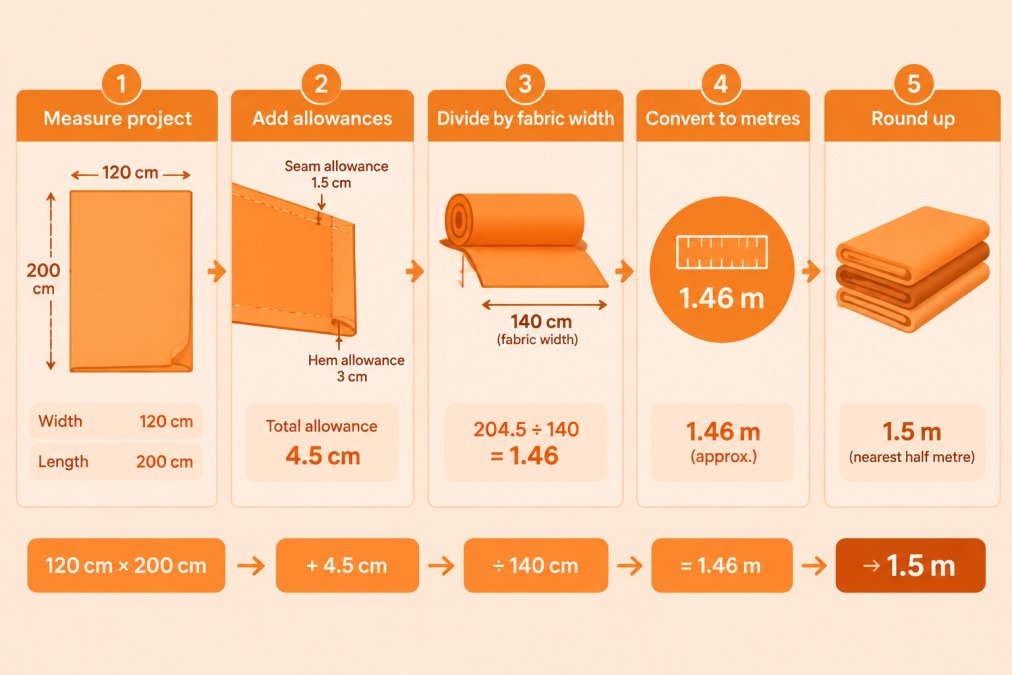
Step 1: Measure the finished size. Measure the item you want to make in centimetres. For a cushion cover, that might be 45cm by 45cm.
Step 2: Add seam and hem allowances. Seams usually take 1.5cm on each edge, and hems take extra. Add the allowances to each side. A 45cm cushion front with 1.5cm seams becomes 48cm by 48cm.
Step 3: Divide by the fabric width. Count how many pieces fit across the width. If the fabric is 110cm wide and each piece is 48cm, two pieces fit with room to spare.
Step 4: Work out the length needed. Each row of pieces needs one piece length of fabric. For two pieces, you need one row, so 48cm of length.
Step 5: Convert to metres and round up. Divide centimetres by 100 to get metres. Round up to the nearest half metre to leave a safety margin. In this example, 48cm becomes 0.48m, which rounds up to 0.5m.
Measuring carefully at this stage saves you from guessing later. Write your figures down, and keep the calculation with your pattern or project notes.
The table below summarises the five steps for working out how much fabric to buy.
| Step | What to do | Note |
|---|---|---|
| 1. Measure the finished size | Measure the item in centimetres | Example: 45cm by 45cm cushion |
| 2. Add seam and hem allowances | Add allowances to each side | Seams usually take 1.5cm per edge |
| 3. Divide by the fabric width | Count how many pieces fit across | Check the width on the listing |
| 4. Work out the length needed | One row of pieces needs one piece length | Two pieces across means one row |
| 5. Convert and round up | Divide centimetres by 100, round up | Round up to the nearest half metre |
Reading a Sewing Pattern's Yardage Chart
Most commercial sewing patterns include a yardage chart on the back of the envelope or in the instructions. This chart lists the fabric length needed for each size and fabric width. It is a reliable starting point, because the designer has already worked out the pattern pieces and the layout.
The chart is usually a grid. Rows are sizes, columns are fabric widths, and each cell gives a length. Some patterns split the grid by view (A, B, C) because different views use different pieces. Before you read a single number, confirm three things: the size you are making, the view you are making, and the fabric width the chart assumes. If any of those differ from what you plan to buy, the figure may not apply.
Here is how to read a typical row, step by step:
- Find your size. Sizes are usually listed down the left-hand side, often in both letter and numeric form. Pick the size that matches your body measurements, not the size you normally buy on the high street.
- Find the view. If the pattern has multiple views, check which column block belongs to the view you are sewing. A dress with sleeves will use more fabric than the sleeveless version.
- Find the fabric width. Charts commonly list two widths, such as 115cm and 150cm. The narrower width usually needs more length because fewer pieces fit across.
- Read across to the length. The cell gives the length in metres or yards. Note which unit the chart uses before you convert.
- Check the layout diagram. Most patterns include a small diagram showing how the pieces are placed on the fabric. It shows whether pieces are cut on the fold, on the straight grain, or in a single layer. If your fabric is narrower than the chart assumes, the layout may not fit as drawn.
A common pattern is for the chart to assume a fabric with no nap and no directional print. If you are using a fabric with a one-way design, a pile such as corduroy or velvet, or a large repeat, the chart figure will usually be too low. Add the repeat allowance covered later in this guide.
Patterns often list yardage in yards. Convert to metres by multiplying yards by 0.9144. For example, 1.5 yards is about 1.37 metres, so round up to 1.5 metres. If the chart lists a fabric width in inches, convert the width too: 45 inches is about 114cm, which is wider than many standard fabrics, so the chart figure may not match your fabric. If you want a deeper walkthrough of converting these figures, the Oxford Reference entry on the metric system gives the official conversion background.
Watch out: a chart figure is a minimum for the exact layout the designer used. If you change the fabric width, add a lining, or cut a different view, recalculate rather than trusting the printed number.
Worked Examples: Cushions, Curtains and a Simple Quilt
Seeing the method applied to real projects makes it much easier to follow. Each example below uses the same five-step workflow, so you can copy the sequence for your own project.
The universal workflow
- Measure the finished size in centimetres.
- Add seam and hem allowances to get the cut size.
- Check the fabric width on the listing.
- Work out how many pieces fit across the width, then how many rows you need.
- Convert to metres, add any repeat or waste allowance, and round up to the nearest half metre.
Example 1: Two cushion covers (45cm × 45cm)
- Finished size: 45cm × 45cm
- Add 1.5cm seams on each side: 48cm × 48cm
- Fabric width: 110cm, so two pieces fit across
- Length needed: 48cm for one row, or 0.5m
- Two covers need two pieces across one row, so 0.5m covers both
Example 2: A pair of lined curtains (120cm wide, 150cm drop)
Curtains need fullness, which means extra width for gathers. A common guide is 1.5 to 2 times the track width.
- Track width: 120cm
- Fullness at 2 times: 240cm of fabric width needed
- Fabric is 140cm wide, so you need two widths per curtain panel
- Add hems and heading allowance: about 15cm to the drop
- Drop: 150cm + 15cm = 165cm, so 1.7m per width, with two widths per panel
- Total for a pair: four widths of 1.7m, which is 6.8m, so buy 7m
Example 3: A simple patchwork quilt (approximately 150cm × 200cm)
Quilts depend on block size, so start with the finished block size and count the blocks.
- Block size: 15cm finished, 15.5cm with seams
- Blocks across: 150cm ÷ 15.5cm, which is about 10 blocks
- Blocks down: 200cm ÷ 15.5cm, which is about 13 blocks
- Total blocks: 130
- For a two-fabric quilt, decide how many blocks of each fabric you need. If you split them evenly, that is 65 blocks of each.
- Each 15.5cm block needs a square of fabric 15.5cm × 15.5cm. From a 110cm-wide strip you can cut seven squares across (7 × 15.5cm = 108.5cm).
- To get 65 squares of one fabric, you need 65 ÷ 7 = about 10 rows, so 10 × 15.5cm = 155cm, or 1.55m per fabric.
- Add a 10 per cent margin for cutting errors: 1.55m × 1.1 = about 1.7m per fabric, so buy 2m of each to be safe.
That last step is where most beginners come unstuck. The arithmetic gives a minimum, but cutting by hand rarely produces every square perfectly, so the margin matters.
Always add a margin for mistakes and cutting errors, particularly for quilts where you may need extra of a fabric later. If you are cutting many small pieces, a rotary cutter and a self-healing mat will keep your squares consistent and reduce waste. Our Olfa 45mm Rotary Cutter and Clover Patchwork Scissors 17cm are both listed in our Measuring Tools and Cutting range; check the live listings for current details and availability.

Allowing for Pattern Matching, Shrinkage and Cutting Waste
Your basic calculation gives you the minimum. Real projects usually need a little more, for three main reasons.
Pattern matching. Printed fabrics have a repeat, which is the distance before the design starts again. If you want stripes or motifs to line up across seams, you need extra length. A small repeat might need 10 to 20cm extra per cut. A large repeat can need much more, so check the repeat size on the listing or the bolt.
Shrinkage. Many cottons shrink when first washed. If your project will be washed, pre-wash the fabric before cutting, and then calculate from the washed size.
Cutting waste. Cutting leaves offcuts, especially with irregular shapes or when pieces do not fit neatly across the width. A simple rule is to add 10 per cent to your total for projects with many small pieces, and 5 per cent for large, simple shapes.
- Printed fabric with a large repeat: add extra length per cut
- Fabric you will wash: pre-wash, then recalculate
- Projects with many small pieces: add around 10 per cent
The Olfa 45mm Rotary Cutter (£14.00) can be used for cutting fabric, and the Clover Patchwork Scissors 17cm (£20.00) have a serrated cutting edge that holds fabric as you cut. You can find both in our Measuring Tools and Cutting range.
How to Convert Yards to Metres Fabric Quantities
Patterns and some older guides use yards, but UK fabric is sold in metres. Converting is simple.
Use this rule: multiply yards by 0.9144 to get metres.
- 1 yard = 0.9144 metres
- 1/2 yard = 0.46 metres, so round up to 0.5 metres
- 3/4 yard = 0.69 metres, so round up to 0.7 metres
- 1 1/2 yards = 1.37 metres, so round up to 1.5 metres
- 2 yards = 1.83 metres, so round up to 2 metres
Rounding up to the nearest half metre is a practical habit. It covers small errors and gives you a little room for pattern matching. If you need the exact figure for a formula, the Oxford Reference entry on the metric system gives the official conversion background.
When a pattern lists yardage for a fabric width in inches, convert the width too. 45 inches is about 114cm, which is wider than many standard fabrics, so the chart figure may not match your fabric.
Common Mistakes to Avoid When Estimating Fabric
Most estimating errors come from a few predictable habits. Watch out for these:
- Forgetting seam allowances. A 45cm finished cushion becomes 48cm once seams are added.
- Ignoring fabric width. A 90cm fabric and a 110cm fabric need very different lengths.
- Measuring the finished item instead of the cut piece. Always measure the pieces you will cut, not just the final size.
- Skipping pre-washing. Shrinkage can leave you short after washing.
- Forgetting pattern repeats. Large motifs need extra length to line up neatly.
- Buying exactly the estimate. Round up, especially for quilts and anything you may want to match later.
A common mistake is buying from a different dye lot later and finding the colour has shifted. For quilts and curtains, buy the full amount in one order where you can.
Ready to Buy: Checking Your Estimate Before You Order
Before you add fabric to your basket, run through a quick checklist:
- Finished size measured in centimetres
- Seam and hem allowances added
- Fabric width confirmed on the product listing
- Number of pieces across the width counted
- Length converted to metres and rounded up
- Pattern repeat and shrinkage allowed for
- Waste margin added
Once your estimate is set, you can browse our fabric for quilting, patchwork and sewing to find the right fabric. Keep your fabric in good condition until the project starts, and our guide on How to Store Quilting Fabric Without Creasing It explains how. If you are still choosing fabric, our Best Fabric for Quilting Projects 2026 guide compares options. For a worked example with a quilt, see our Quilting Patterns for Beginners: Step by Step guide. If you are ready to order, our Buy Premium Sewing Fabric Online: 2026 Guide explains what to look for.
For delivery terms, see our delivery policy. If you have questions about your project, contact us and we will help you check your figures before you buy.
Frequently Asked Questions
How do I calculate how much fabric I need for a sewing project?
Start by measuring the finished piece, then add seam and hem allowances. Divide the total length by the usable width of your fabric, which is usually 110cm or 140cm, to see how many lengths you need. Multiply by the length of each piece and round up. Always add a small margin for cutting waste, and check the pattern envelope or listing for the exact figure.
How many metres of fabric do I need for a beginner sewing project?
Most simple beginner projects, such as a tote bag or a cushion cover, need between half a metre and one and a half metres of 110cm wide fabric. Garments and curtains need considerably more. The exact amount depends on the pattern and the width of your fabric, so measure your pieces before buying rather than relying on a general figure.
Can I convert fabric yards to metres?
Yes. One yard is 0.9144 metres, so multiply the number of yards by 0.9144 to get metres. For example, 2 yards equals about 1.83 metres. Since UK fabric is sold in metres, it helps to convert any yardage from a pattern or US-based guide before ordering, then round up to the nearest half metre.
How much extra fabric should I allow for shrinkage and mistakes?
A common approach is to add around 10 per cent to your total for pre-washing shrinkage, pattern matching and cutting errors. Cotton shrinks more than many synthetics, so pre-wash a test swatch to see how much it changes. For patterned fabric, allow extra so motifs line up across seams.

Related Posts

How to Clean and Oil Your Embroidery Machine Properly

How to Sew with Cotton Jersey Fabric: A Practical Guide

Choosing Embroidery Software for Beginners: A Practical Guide

How to Troubleshoot Sewing Machine Tension Problems

What Happens When a Sewing Machine Needle Breaks

Best Sewing Projects for Absolute Beginners: Start Here
