

Quilting Patterns for Beginners: Step by Step
Last Updated: October 23, 2026
Quick Summary
Quilting patterns for beginners start with accurate fabric cutting using a rotary cutter and ruler, then progress through simple piecing with a 6mm (1/4 inch) seam allowance, and finish with quilting and binding. The Nine-Patch and Charm Pack patterns are ideal starting projects that teach fundamental skills without overwhelming complexity.
- Standard strip width is 6mm (2.5 inches) and common square size is 6mm x 6mm (2.5 x 2.5 inches) for basic quilting patterns
- Half-square triangles are cut from 73mm (2.875-inch) squares diagonally, whilst quarter-square triangles come from 83mm (3.25-inch) squares
- Press seams to the darker fabric when possible and use a 6mm (1/4 inch) seam allowance consistently throughout assembly
- Nine-Patch blocks use nine squares in a three-by-three grid with five squares of one colour and four of another
- Straight-line quilting along seams or 6mm (1/4 inch) away from seams is the easiest approach for beginners
Table of Contents
- What You'll Need to Start Quilting
- How to Cut Fabric for Quilting: The Foundation
- Easy Quilt Patterns for Beginners to Master
- Step-by-Step Assembly Process
- Quilting Your Project
- Quilt Binding for Beginners: Finishing Your Work
- Common Mistakes to Avoid When Starting Out
- Frequently Asked Questions
What You'll Need to Start Quilting
Before you begin your first quilting project, gather the essentials. You'll need fabric, a rotary cutter, a quilting ruler, a cutting mat, thread, needles, and a sewing machine. The good news is you don't need expensive equipment to start; quality basics will serve you well.
A reliable sewing machine is your foundation. The Brother L14S Sewing Machine is an excellent choice for beginners if you prefer something lightweight and straightforward.

For thread, invest in good quilting thread. Schmetz Stepp-Nader Quilting Needle 130/705 H-Q 75/11 + 90/14 designed specifically for quilting help prevent skipped stitches and breakage. Cotton fabric is your best bet; it's forgiving, easy to handle, and perfect for learning.

You'll also need:
- A rotary cutter (sharp blade is essential)
- A self-healing cutting mat (at least A2 size)
- Clear quilting rulers (15x60cm is standard)
- Pins
- Seam ripper for corrections
- Iron and ironing board for pressing
Don't rush out to buy everything at once. Start with basics and add tools as you progress. At Fabric Mouse, we stock quality quilting supplies that won't break the bank, and our team can help you choose what suits your first project.
How to Cut Fabric for Quilting: The Foundation
Accurate cutting is where quilting patterns for beginners truly begin. Learn how to use quilting rulers properly to ensure precision in every cut. Precision here saves time and frustration later. Most beginners struggle because they rush the cutting stage, but spending five extra minutes cutting correctly saves thirty minutes in assembly.
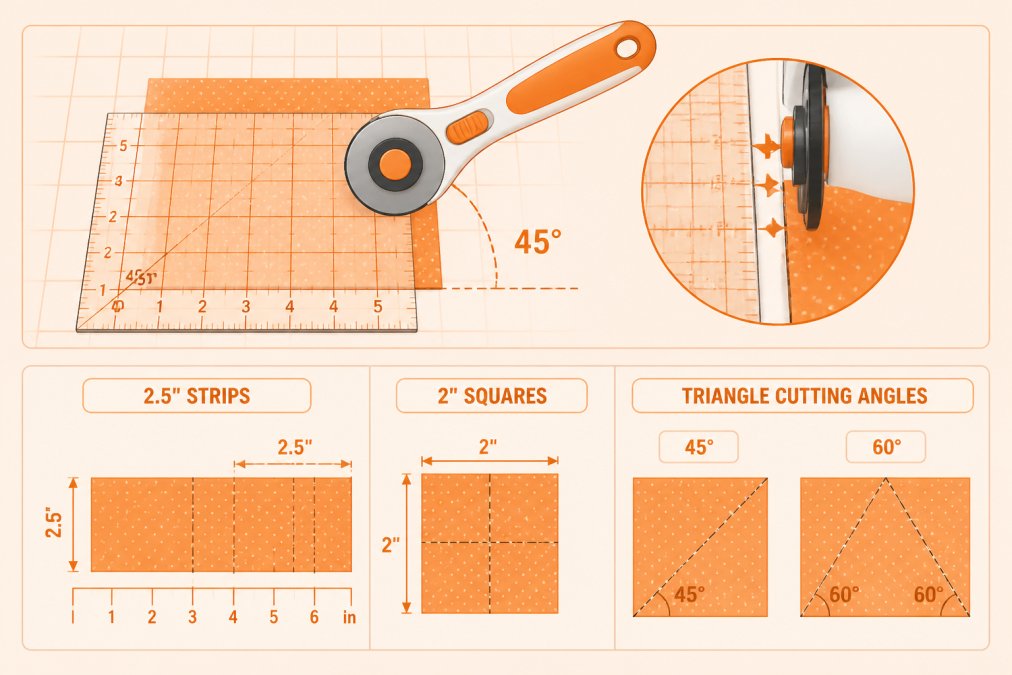
Straight cuts and squares
Start with straight cuts. These form the foundation of most quilting patterns for beginners. Fold your fabric in half lengthwise, selvedge to selvedge. Place your ruler on top and align it with the folded edge.
Hold the ruler firmly with your non-dominant hand. Press down with your fingers spread wide. Position your rotary cutter against the ruler edge and roll it away from your body in one smooth motion. Don't saw back and forth; one clean stroke gives cleaner edges.
For squares, cut strips first. A standard strip is 6mm (2.5 inches) wide. Once you have strips, measure and cut them into 6mm (2.5-inch) squares. Stack strips before cutting to speed up the process.
Key measurements to remember:
- Standard strip width: 6mm (2.5 inches)
- Common square size: 6mm x 6mm (2.5 x 2.5 inches)
- Border strips: typically 6mm to 10mm (2.5 to 4 inches)
Practice on scrap fabric first. You'll develop a feel for the pressure needed and the rhythm of cutting. After three or four strips, your hands will know what to do.
Triangles and half-square blocks
Triangles are trickier than squares, but they're essential for many quilting patterns for beginners. The most common triangle is the half-square triangle, literally a square cut diagonally in half.
To make half-square triangles, cut squares first. A 73mm (2.875-inch) square yields two half-square triangles when cut diagonally. Cut from corner to corner without stopping partway.
For quarter-square triangles (used in more complex patterns), cut a square diagonally twice, creating four triangles. This requires two diagonal cuts perpendicular to each other.
Angles matter. A 45-degree angle gives you half-square triangles. A 60-degree angle creates equilateral triangles for hexagon patterns. Invest in a ruler with angle markings to make this easier.
Common triangle cuts:
- Half-square: from 73mm (2.875-inch) squares
- Quarter-square: from 83mm (3.25-inch) squares
- 60-degree triangles: use a 60-degree ruler
- 45-degree triangles: use a 45-degree ruler
Take your time with triangles. Rushed cuts lead to wonky blocks. If you're new to cutting triangles, practice on a few squares before committing to your actual fabric.
Key measurements form the foundation of accurate quilting cuts.
| Cut type | Standard size | Purpose |
|---|---|---|
| Strip width | 6mm (2.5 inches) | Foundation for squares and blocks |
| Square | 6mm x 6mm (2.5 x 2.5 inches) | Nine-Patch and basic patterns |
| Half-square triangle | From 73mm (2.875-inch) squares | Essential for many patterns |
| Quarter-square triangle | From 83mm (3.25-inch) squares | Complex pattern designs |
| Border strips | 6mm to 10mm (2.5 to 4 inches) | Quilt edges and framing |
| Binding strips | 6mm (2.5 inches) | Finishing quilt edges |
Easy Quilt Patterns for Beginners to Master
The best quilting patterns for beginners are simple, forgiving, and teach fundamental skills. We've chosen three that build confidence and deliver beautiful results.
The Simple Nine-Patch Block
The Nine-Patch is the perfect starting pattern. It's literally nine squares arranged in a three-by-three grid. This teaches you cutting accuracy and basic piecing without overwhelming complexity.
You'll need two contrasting fabrics. Cut 89mm (3.5-inch) squares from each fabric. You need nine squares total, five of one colour and four of the other. The arrangement creates a simple cross pattern.
Sew the squares into three rows of three. Press seams between each row. Then sew the three rows together. One Nine-Patch block is complete.
Make four to six blocks and you have a small wall hanging. Make twelve to twenty blocks for a lap quilt. The beauty of this pattern is its versatility; change your fabric colours and the same block looks entirely different.
The Charm Pack Quilt
A Charm Pack is a bundle of pre-cut 13cm (5-inch) squares. This eliminates cutting work and lets you focus on piecing.
Simply arrange the squares in rows. Six squares across and twelve rows down creates a 30-inch by 60-inch quilt. Sew rows together, press, and you're ready for quilting. This pattern teaches you assembly without the stress of cutting.
The advantage here is speed. Your quilt top comes together in an afternoon. Beginners often lose motivation during long cutting sessions; Charm Pack quilts keep the momentum going.
The Strip Quilt
Strip quilts use long, narrow fabric strips sewn side by side. Cut strips 6mm (2.5 inches) wide from your chosen fabrics. Sew them together lengthwise into a panel. Cut this panel into blocks and arrange them in a new pattern.
This is more advanced than Nine-Patch but still manageable for beginners. It teaches you how simple elements combine into complex-looking designs. The finished quilt looks intricate, but the construction is straightforward.
Step-by-Step Assembly Process
Now you have cut pieces. Assembly is where quilting patterns for beginners come to life. This is also where precision matters most; small errors compound as you add more pieces.
Piecing your blocks together
Start with a 6mm (1/4 inch) seam allowance. This is the standard in quilting, and it's crucial for blocks to fit together properly. The Brother 1/4 Inch Piecing Foot with Guide F057 takes the guesswork out of this. The built-in guide keeps your fabric exactly where it needs to be.
Brother 1/4 Inch Piecing Foot with Guide F057 (XC7416252) →
Sew your first two squares together. Chain piece if you have multiple blocks; sew one pair, then feed the next pair without cutting thread between them. This saves thread and time.
Press your seams after every step. Use an iron set to medium heat. Press to one side, not open. Pressing to the side creates stronger seams and helps blocks nest together properly.
Pressing seams properly
Pressing is not ironing. Ironing involves moving the iron back and forth. Pressing means placing the iron down, holding it, then lifting. This prevents stretching your fabric.
Press seams to the darker fabric when possible. If both fabrics are similar, press to the side that reduces bulk. In Nine-Patch blocks, press seams in alternating directions on each row; this helps rows nest together without bunching.
Use a pressing cloth if your fabric is delicate. Protect your ironing board with a thin cotton cloth. Some quilters press on a folded towel for extra cushioning.
Assembling the quilt top
Once all blocks are complete, arrange them on a design wall or floor. Step back and look at the overall design. This is your moment to adjust colours or swap blocks if something doesn't feel right.
Sew blocks into rows. Sew rows together. Press seams between rows in opposite directions; this helps them nest and reduces bulk at intersections.
Square up your quilt top. Use a large ruler to trim edges straight. This might seem wasteful, but a straight edge makes binding much easier. A crooked quilt top leads to binding problems later.
Quilting Your Project
Quilting holds all three layers together: top, wadding, and backing. For beginners, simple quilting works beautifully. You don't need intricate designs.
Straight-line quilting is the easiest approach. Quilt along seams or 6mm (1/4 inch) away from seams. Use a walking foot to keep all layers moving evenly. The Janome 767403016 Walking Foot prevents shifting and puckering.
Stitch in the ditch, right along the seam line, for invisible quilting. Or stitch 6mm (1/4 inch) away for visible lines that add texture. Both approaches work equally well.
Start quilting from the centre and work outward. This prevents wrinkles and puckering. Take your time. Rushing quilting ruins otherwise perfect work.
Quilt Binding for Beginners: Finishing Your Work
Binding finishes the edges and makes your quilt durable. It's the final step in quilting patterns for beginners, and it's simpler than most people think.
Preparing your binding strips
Cut binding strips 6mm (2.5 inches) wide. You need enough strips to go around your quilt perimeter plus 30cm (12 inches) for corners and overlap. Sew strips end-to-end at 45-degree angles to create one long strip.
Press the strip in half lengthwise, wrong sides together. This creates a double-fold binding that's durable and professional-looking.
Sewing the binding to your quilt
Use a 6mm (1/4 inch) seam allowance. Start on one side, not at a corner. Sew the binding to the front of the quilt, using a walking foot. Stop 6mm (1/4 inch) from corners.
At corners, fold the binding up at 45 degrees, then fold it down to create a mitred corner. Continue sewing. This creates neat, professional-looking corners.
Hand-stitching the final edge
Fold the binding to the back and hand-stitch it down using a blind stitch. This is the only hand-sewing in the entire project, and it's meditative work. Use thread that matches your binding.
The blind stitch hides the thread inside the fold of the binding. Your stitches should be invisible from the front. Take small stitches, about 3mm (1/8 inch), for durability.
Common Mistakes to Avoid When Starting Out
Most beginners make the same errors. Knowing them helps you skip ahead.
Inconsistent seam allowances: This is the biggest culprit. If some seams are 6mm (1/4 inch) and others are 10mm (3/8 inch), blocks won't fit together. Invest in a 6mm (1/4 inch) foot and use it consistently.
Pressing too aggressively: Rough pressing stretches fabric and distorts blocks. Press gently. Let the heat do the work, not pressure.
Rushing the cutting stage: Accurate cutting makes everything else easy. Spend time here. One extra minute cutting saves ten minutes later.
Skipping design planning: Arrange blocks before sewing rows together. Changing your mind after assembly is frustrating. Five minutes of planning prevents hours of ripping.
Using old thread: Thread degrades over time. Old thread breaks easily and creates weak seams. Buy fresh thread for quilting projects.
Quilting too tight: Beginners often quilt with tension that's too high, causing puckering. Use a walking foot and let the machine do the work.
Quilting patterns for beginners are achievable with patience and the right approach. Start simple; Nine-Patch or Charm Pack quilts teach you everything you need without overwhelming complexity. At Fabric Mouse, we stock quality fabrics like Moda Lucky Day Charm Pack and essential tools to support every stage of your project. Our team can help you select fabrics that work together and recommend equipment that makes the process smoother. Contact us for guidance on your first quilt, and you'll have a finished project to treasure.
Frequently Asked Questions
What is the easiest quilt pattern for a beginner?
The Nine-Patch is widely considered the easiest quilting pattern for beginners. It uses just nine squares of equal size arranged in a 3x3 grid, making it simple to cut, piece, and understand. The charm of this pattern is that you can create endless colour combinations whilst learning fundamental quilting skills like accurate cutting and consistent seam allowances. Once you've mastered the Nine-Patch, you'll have the confidence to tackle more complex quilting patterns.
What quilting supplies for beginners do I actually need?
Start with a rotary cutter, self-healing cutting mat, quilting ruler, fabric scissors, thread, needles, and a sewing machine. Quality fabrics make a real difference to your finished quilt. You'll also benefit from a 6mm (1/4 inch) piecing foot, such as the Brother 1/4 Inch Piecing Foot with Guide, which helps you maintain accurate seams, essential for quilting. A design wall or design board helps you visualise your layout before sewing.
How long does it take to make a beginner quilt?
A simple beginner quilt typically takes 10-20 hours spread over several weeks, depending on the pattern complexity and your experience level. A small Nine-Patch quilt or charm pack project might take 10-15 hours, whilst a larger bed quilt takes considerably longer. Don't rush the process; quilting rewards patience and careful attention to detail. Many beginners find it helpful to work on their quilt in short, enjoyable sessions rather than trying to finish quickly.
Do I need a special sewing machine for quilting?
No, you don't need an expensive quilting machine to start. A reliable basic machine like the Brother L14s is perfectly adequate for piecing quilt blocks and assembling your quilt top. What matters more is having the right feet and needles, such as Schmetz Stepp-Nader Quilting Needles, and taking time to learn proper technique. As your skills grow, you might explore machines with more features, but countless beautiful quilts have been made on simple, straightforward machines.

Related Posts

How to Sew Mitered Corners on Hems

Standard Sewing Machine for Free-Motion Quilting: Pros and Cons

How to Use Quilting Rulers for Beginners

Types of Premium Cotton for Quilting

Why Bobbin Thread Bunches Up: Fix It Now

How to Grade Sewing Patterns for Custom Fit
