

How to Sew Mitered Corners on Hems
Last Updated: October 22, 2026
Quick Summary
To sew mitered corners on hems, fold the fabric diagonally at each corner so the two hem lines meet at a 45-degree angle, then trim along this diagonal fold leaving a 0.6 cm seam allowance. Fold your hem up twice, press firmly between each fold, and stitch close to the inner fold using a small stitch length for a professional, bulk-free finish.
- Mark your hem depth on all four sides before folding, using a seam gauge or ruler for accuracy.
- Press between each fold step to ensure sharp creases and easier stitching.
- Leave a 0.6 cm seam allowance when trimming the diagonal corner to prevent fraying without creating bulk.
- Use a blind stitch on a machine or ladder stitch by hand for nearly invisible stitching.
- Start practising on small projects like cloth napkins before moving to larger items like quilts.
Table of Contents
- What Are Mitered Corners and Why They Matter
- What You'll Need Before You Start
- How to Fold a Mitered Corner Step by Step
- Sewing Mitered Corners on Double-Fold Hems
- Working with Wide Hem Mitered Corners
- Pressing Mitered Hems for a Professional Finish
- Common Mistakes to Avoid
- Finishing Raw Edges on Mitered Corners
- Practice Projects to Master the Technique
- Frequently Asked Questions
What Are Mitered Corners and Why They Matter
A mitered corner is a diagonal fold where two fabric edges meet at a 45-degree angle, creating a neat, professional finish without bulk. This technique is essential for sewing clean hems on items like quilts, napkins, tablecloths, and garments. When you sew mitered corners on hems, you eliminate the thick layers that would normally pile up where two folded edges overlap.
The real benefit? Professional results that look handmade, not homemade. Most beginners avoid this technique because it seems complicated. It's not. Once you understand the fold sequence, mitered corners become faster than dealing with bulky overlaps.
At Fabric Mouse, we work with sewists of all levels who want their projects to look polished. Learning to sew mitered corners on hems is one of the most rewarding skills you can master. It transforms ordinary projects into pieces you'll be proud to display or gift.
What You'll Need Before You Start
Gather these tools before you begin. Having everything ready makes the process smooth and prevents frustration.
Essential tools:
- Sharp fabric scissors or rotary cutter
- Measuring ruler or seam gauge
- Iron and ironing board
- Pins or clips
- Needle and thread (or sewing machine)
- Pressing cloth (optional but helpful)
The Prym Seam Gauge is invaluable for this work. It has 45-degree angle markings built in, which makes marking your fold lines precise and quick. The gauge costs £2.50 and will save you time on every project.

For cutting, the Olfa 45mm Rotary Cutter delivers clean, accurate cuts through multiple fabric layers. It's particularly useful when you're working with larger pieces where mitered corners matter most.
Fabric considerations:
- Medium-weight fabrics work best for learning
- Avoid very stretchy or slippery fabrics initially
- Quilting cotton is ideal for practice projects
How to Fold a Mitered Corner Step by Step
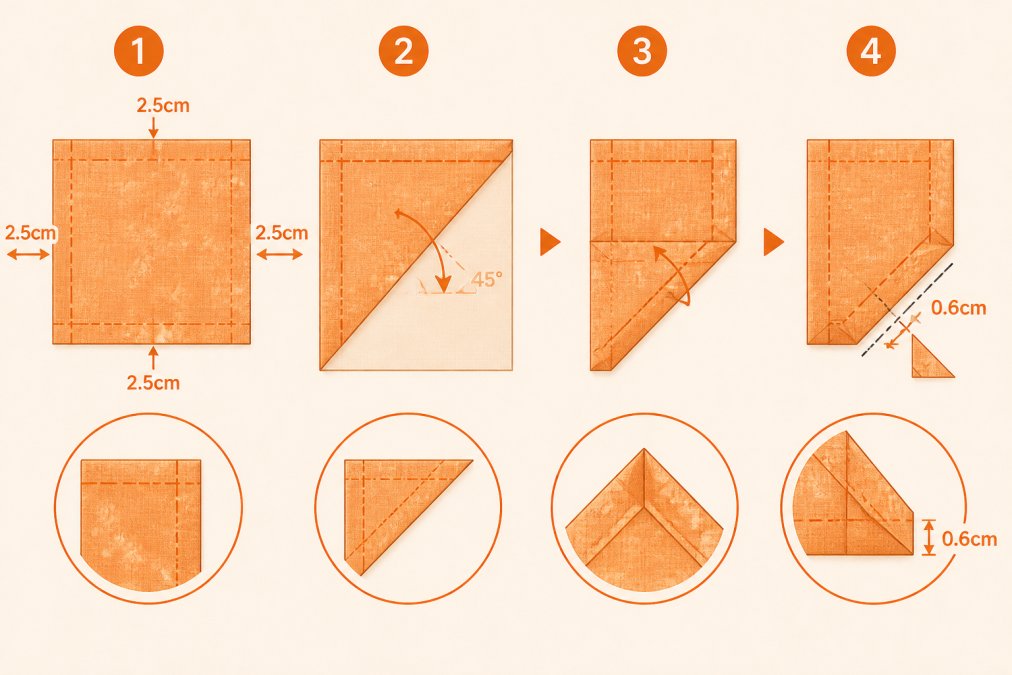
The process of how to fold a mitered corner involves four main steps. Master this sequence and you'll sew mitered corners on hems confidently every time.
Step 1: Mark your hem allowance
Measure and mark your hem depth on all four sides. For a 2.5 cm hem, mark 2.5 cm from the edge all around. Use a seam gauge or ruler. Press this fold line lightly with your iron to crease it.
Step 2: Create the diagonal fold
At each corner, fold the fabric diagonally so the two hem lines meet exactly. The fold creates a 45-degree angle. This is where the geometry matters. When you fold correctly, the corner point sits exactly where the two hem lines intersect.
Step 3: Mark the fold line
Crease this diagonal fold sharply. You now have a clear line showing where to trim. This is your cutting guide.
Step 4: Trim the corner
Cut along the diagonal crease, leaving about 0.6 cm seam allowance. This removes the bulk that would create lumps in your finished hem.
Sewing Mitered Corners on Double-Fold Hems
Double-fold hems are the most common finish for garments and home décor items. This method uses two folds to encase the raw edge completely. When you sew mitered corners on double-fold hems, you're working with precision because the folds stack on top of each other.
The process:
Start with your mitered corner already folded and trimmed (from the previous section). Fold the hem up once to the marked line. Press this fold. Then fold it up again by the same amount. Press again. Your raw edge is now completely hidden.
At the corner, the diagonal fold you created earlier guides your stitching. The two folded edges should meet perfectly at that 45-degree angle. If they don't align, unfold slightly and adjust.
Stitch close to the inner fold using a matching thread. Use a small stitch length (about 2 mm) for strength. On a machine, a blind stitch gives invisible results. By hand, a ladder stitch (also called slip stitch) is nearly invisible.
Common mistakes happen when sewers skip the pressing step or rush the corner alignment. Take time to press between each fold. This makes stitching easier and results look sharper.
Working with Wide Hem Mitered Corners
Wide hems demand extra care because the folds are deeper and the corner bulk is greater. A 5 cm hem is common on quilts and heavy linens. When you sew mitered corners on wider hems, the technique remains the same but the execution requires more precision.
Key differences with wide hems:
The diagonal cut becomes more critical. With a 5 cm hem, you're removing a larger piece of fabric at each corner. Measure carefully. A 0.6 cm seam allowance still applies, but the overall triangle you're cutting is larger.
Press more aggressively. Wide folds hold creases better when you really press them down. Use a hot iron and a pressing cloth to protect delicate fabrics.
When folding the hem twice, ensure the corner point stays sharp and defined. If the point becomes rounded or the folds slip, unfold and re-press.
Test on scrap fabric first if you're working with expensive material. One practice corner takes five minutes and prevents costly mistakes on your actual project.
Pressing Mitered Hems for a Professional Finish
Pressing is not optional. It's the difference between amateur and professional results. Many sewists underestimate how much pressing improves their work.
Pressing sequence:
Press the initial diagonal fold before you trim. Press the first hem fold. Press the second hem fold. Press again after stitching. That's four pressing steps for one corner.
Use medium to high heat depending on your fabric. Cotton and linen tolerate high heat. Synthetics need lower temperatures. Always test on scrap fabric first.
Press from the wrong side when possible. This prevents shine marks on delicate fabrics. Use a pressing cloth as a barrier between the iron and your fabric.
Pay special attention to the corner point. Press it flat and sharp. A dull, rounded corner looks unfinished. A crisp corner looks professional.
Let the fabric cool completely before moving it. Hot fabric is still flexible. Cooling sets the crease permanently.
Common Mistakes to Avoid
Mistake 1: Skipping the diagonal fold
Some sewers try to sew mitered corners without the diagonal fold. They simply overlap the two hem edges. This creates bulk and an unfinished appearance. The diagonal fold is essential.
Mistake 2: Cutting too close to the corner
Leave at least 0.6 cm seam allowance after your diagonal cut. If you cut closer, the corner frays and unravels. If you leave more than 1.2 cm, the corner becomes bulky again.
Mistake 3: Pressing too lightly
Light pressing leaves wrinkles and soft creases. Press firmly and hold the iron in place for a few seconds. The fabric needs heat and pressure to hold the fold.
Mistake 4: Rushing the corner alignment
Take time to match the two folded edges at the corner. Misaligned corners look crooked. This is where most visible mistakes happen.
Mistake 5: Using dull scissors
Dull blades drag and distort fabric. Sharp scissors cut cleanly. Replace blades regularly or invest in quality tools like the Hemline Soft Grip Hobby Scissors, which maintain their edge and cost just £6.00.
Finishing Raw Edges on Mitered Corners
Raw edges at mitered corners can fray, especially on natural fabrics like cotton and linen. Finishing these edges prevents unravelling and extends the life of your project.
Method 1: Whip stitch
After your main hem stitch, use a whip stitch to close the diagonal fold completely. This encases the raw edge and creates a sealed corner. Work from the inside of the fold using thread that matches your fabric.
Method 2: Overlock or zigzag stitch
If you have an overlocker, run the raw edges through it before pressing the final hem fold. A zigzag stitch on a regular machine also works. This prevents fraying on fabrics prone to it.
Method 3: Seam sealant
For quilts and items that will be washed frequently, a small dab of seam sealant on the raw edge provides insurance against fraying. Apply it sparingly and let it dry completely before pressing.
Method 4: Binding
For quilts, consider binding the edges instead of hemming. Binding covers raw edges entirely and is more durable than a simple hem.
Choose the method based on your fabric and the item's purpose. Quilts need more protection than decorative napkins.
Practice Projects to Master the Technique
Start with simple projects before tackling complex items. Building confidence with small projects prevents frustration on large ones.
Project 1: Napkins
Cloth napkins are ideal for learning. They're small, forgiving, and useful. A 40 cm square napkin has four corners to practice on. If one corner isn't perfect, you still have three more chances on the same project.
Finished napkins make excellent gifts. This motivates you to get the technique right.
Project 2: Tablecloth
A basic rectangular tablecloth has four corners and teaches you to work on a larger scale. The larger fabric is easier to handle than small pieces. Four corners give you enough practice to see improvement.
Project 3: Pillowcase
Pillowcases have four corners and are used daily. This project teaches you that mitered corners are worth the effort because they look professional and hold up to washing and use.
Project 4: Quilt border
If you're ready for a challenge, quilt borders often include multiple mitered corners. This is where the technique really shines. A well-executed mitered corner on a quilt border looks stunning.
Learning to sew mitered corners on hems transforms your sewing. Projects look more polished and professional. The technique takes practice, but it's absolutely learnable.
Start with simple projects and quality tools. The Prym Seam Gauge and Olfa Rotary Cutter are investments that pay for themselves in time saved and accuracy gained. At Fabric Mouse, we stock everything you need to master this skill, from precision measuring tools to premium fabrics perfect for practising. Contact us for advice on selecting the right fabric for your first mitered corner project.
Frequently Asked Questions
How do you sew a mitered corner on a hem?
Fold your fabric at a 45-degree angle to create the mitered corner, then press firmly. Fold the hem allowance up and over the corner point, ensuring both edges align perfectly. Stitch along the fold line using a straight stitch, securing the corner layers together. Use a seam gauge like the Prym Seam Gauge (which has 45-degree markings) to ensure accuracy. Trim excess fabric and press the finished corner flat for a neat result.
What is the difference between a mitered corner and a double-fold hem corner?
A standard mitered corner uses a single diagonal fold at 45 degrees, creating a neat point where two hems meet. A double-fold hem mitered corner involves folding the fabric twice, once for the hem allowance and again for the finished edge, then creating the 45-degree diagonal fold. Double-fold versions are thicker and more durable, making them ideal for quilts and heavier fabrics. The double-fold method provides extra fabric layers for strength and a more finished appearance on the underside of your project.
How wide should a mitered hem be?
For most garments and quilts, a 2.5-5 cm hem width works well for mitered corners. Smaller hems (2.5 cm) suit lightweight fabrics and garments, whilst wider hems (5 cm or more) are better for quilts, home décor items, and heavier fabrics. The width you choose affects how much fabric you trim away at the corner point. Wider hems require more careful trimming to prevent bulk. Use a Prym Seam Gauge to mark your hem width consistently, ensuring both sides of your corner are even.
How do you keep mitered corners flat?
Proper pressing is essential for flat mitered corners. Press each fold before stitching, using a hot iron and a pressing cloth if your fabric is delicate. After stitching the corner seam, press the finished corner from both sides to set the stitches and eliminate puckers. Trim excess fabric layers at the corner point (leaving about 6 mm) to reduce bulk. Press again after trimming. For heavier fabrics, consider using a pressing ham or rolled towel under the corner whilst pressing to maintain shape and prevent creasing.

Related Posts

Standard Sewing Machine for Free-Motion Quilting: Pros and Cons

How to Use Quilting Rulers for Beginners

Types of Premium Cotton for Quilting

Why Bobbin Thread Bunches Up: Fix It Now

How to Grade Sewing Patterns for Custom Fit

How to Fix Gaping Armholes in Dresses: 7 Methods
