

How to Grade Sewing Patterns for Custom Fit
Table of Contents
- What Grading Sewing Patterns Means
- Why Grade Sewing Patterns Instead of Resizing
- How to Grade Between Sewing Pattern Sizes
- Understanding Sewing Pattern Size Chart Measurements
- Making a Full Bust Adjustment to Your Sewing Pattern
- Essential Sewing Pattern Grading Tools
- Step-by-Step Grading Process for Custom Fit
- Common Grading Mistakes to Avoid
- Frequently Asked Questions
Last Updated: October 17, 2026
What Grading Sewing Patterns Means
Grade sewing patterns by enlarging or reducing a pattern whilst maintaining its original design proportions and fit. Unlike simple resizing, which can distort a garment's shape, grading adjusts all the pattern pieces systematically so the finished garment looks and fits correctly across different sizes.
When you grade a pattern, you're scaling it mathematically. Each seam, curve, and measurement increases or decreases by the same increment. This keeps the garment's proportions balanced. A neckline that sits perfectly on a size 12 will still sit perfectly on a size 14 or size 10.
At Fabric Mouse, we work with sewists who understand that one-size-fits-all patterns rarely deliver that perfect fit. Grading is the skill that transforms a good pattern into a custom-fit garment tailored to your exact measurements.
Why Grade Sewing Patterns Instead of Resizing
Resizing software or photocopiers seem like quick solutions, but they create problems. A uniform 10% enlargement affects everything equally, seam allowances, armholes, necklines, and ease all grow together. This throws off the garment's proportions.
Grading works differently. You adjust pattern pieces based on where the body actually changes. Your bust might grow 5cm between sizes, but your shoulder width grows only 1.25cm. Grading captures these differences. Resizing ignores them.
Consider a fitted dress. If you simply enlarge it 20%, the armhole gets bigger, the neckline gets bigger, and the waist placement shifts. The dress no longer fits properly. When you grade properly, the armhole grows just enough, the neckline stays in the right place, and the waist sits where it should.
Professional pattern makers grade patterns because it's the only way to ensure consistent fit across a size range. Home sewists who learn to grade gain that same control.
How to Grade Between Sewing Pattern Sizes
Grading between pattern sizes follows a logical sequence. Start by understanding your size range. If your pattern comes in sizes 8, 10, 12, 14, and 16, each step up is one size grade.
The standard approach uses grading increments, the amount you add to each measurement between consecutive sizes. For most garments, bust increments run 2.5cm to 5cm per size. Waist increments are often smaller, around 2.5cm. Length increments vary by garment type.
Once you know your increments, you apply them to every pattern piece. A front bodice piece gets wider and longer by those exact amounts. The back piece does too. Sleeves, facings, and all supporting pieces grade together.
The mathematics is straightforward. The skill lies in maintaining the pattern's balance and shape as you grade. This is where most sewers struggle, and where practice makes a real difference.
| Measurement | Typical Increment | Why It Matters |
|---|---|---|
| Bust | 2.5-5cm | Affects bodice width and ease |
| Waist | 2-2.5cm | Smaller than bust to maintain shape |
| Hip | 2.5-5cm | Matches bust for proportion |
| Sleeve length | 1.25-2.5cm | Varies by arm proportions |
| Pattern length | 1.25-2.5cm | Depends on torso variation |
Understanding Sewing Pattern Size Chart Measurements
A sewing pattern size chart tells you the finished garment measurements at each size. These measurements include ease, the extra room built in for comfort and movement.
Read the chart carefully. A size 12 might have a finished bust of 97cm. That's not your body measurement; it's the garment measurement. Your body measurement plus ease equals the finished size.
Most patterns list these key measurements:
- Finished bust
- Finished waist
- Finished hip
- Sleeve length
- Bodice length
- Overall length
The differences between consecutive sizes on the chart show you your grading increments. If size 12 has a 97cm bust and size 14 has a 102cm bust, your bust increment is 5cm.
Use a ruler to measure your actual body. Compare your measurements to the chart. This tells you which size to start with and how much you need to grade to reach your exact fit.
Making a Full Bust Adjustment to Your Sewing Pattern
A full bust adjustment is a targeted grade for sewists whose bust measurement falls between two pattern sizes. This is one of the most common fit problems.
Say you're between a size 12 and size 14. Your bust measures 99cm, but size 12 is 97cm and size 14 is 102cm. A full bust adjustment lets you grade just enough to fit your measurement without oversizing the rest of the garment.
Calculate the difference: 99cm minus 97cm equals 2cm extra. You need to add 1cm to each side of the front and back bodice pieces (total 2cm across the width).
The tricky part is maintaining the pattern's shape. Add width at the side seams, not the centre front or back. This preserves the garment's balance and prevents the neckline or armholes from shifting.
Grading the bodice alone isn't enough. You must also grade the sleeves and any facing pieces proportionally. A 2cm bust adjustment typically means a 0.5cm to 1cm sleeve width adjustment.
This targeted approach works for any measurement mismatch, not just bust. The same logic applies to length, hip, or waist adjustments.
Essential Sewing Pattern Grading Tools
Accurate grading requires the right tools. The Prym ruler is an essential choice for pattern work. The Prym ruler (£3.50) features precise centimetre markings and a flexible design that clings to fabric and pattern for exact measurement. Its notches make marking 90-degree angles and seam positions straightforward.

For cutting your graded patterns, the Olfa 45mm rotary cutter (£14.00) delivers clean, accurate cuts through paper and fabric. The ergonomic grip and dual-action safety lock make it safe and comfortable for extended pattern work.

Beyond these essentials, gather:
- A clear ruler (at least 60cm long)
- Pattern paper or medical paper
- A sharp pencil or pattern marker
- A measuring tape
- Tracing wheel (optional but helpful)
- French curve ruler (for smooth curves)
Quality tools prevent measurement errors. A dull pencil or imprecise ruler introduces mistakes that compound across all your pattern pieces.
Step-by-Step Grading Process for Custom Fit
The grading process follows a logical sequence. Each step builds on the previous one. Rushing through any step introduces errors that affect the entire pattern.
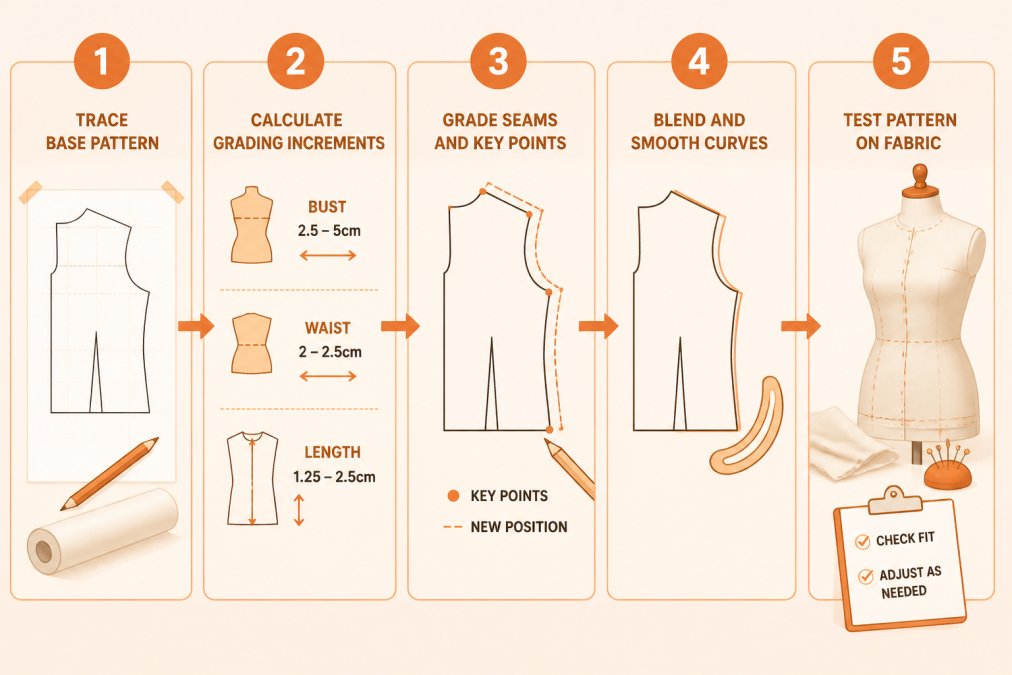
Step 1: Trace and Mark Your Base Pattern
Start with your original pattern size. Lay it flat on pattern paper. Use your Prym ruler to trace around every piece accurately. Include all markings: grain lines, notches, darts, and seam allowances.
Mark your starting measurements on the pattern. Write the bust, waist, hip, and length directly on each piece. These become your reference points for grading.
Use a pencil, not a pen. You'll need to erase and adjust as you work. Mark your grading increments clearly, these numbers guide every calculation ahead.
Step 2: Calculate Your Grading Increments
Determine how much you're grading. If you're going from size 12 to size 14, and your size chart shows a 5cm bust increase, your bust increment is 5cm.
Divide this among all pieces. For a two-piece bodice (front and back), add 2.5cm to each piece's width. For a four-piece bodice, add 1.25cm to each piece.
Calculate increments for waist, hip, and length separately. Waist usually increases less than bust. Length depends on your torso proportions.
Write these increments on your pattern paper before you start grading. This keeps you consistent across all pieces.
Step 3: Grade Seams and Key Points
Mark new positions on your pattern pieces using your calculated increments. Start at the side seams, where most width adjustment happens.
Use your ruler to measure from the original seam line. Mark your new seam position at the calculated increment. Do this at the bust point, waist, and hip for bodice pieces.
For sleeve pieces, mark new positions at the cap, underarm seam, and cuff. For length, mark new positions along the grain line at regular intervals.
Connect these points with light pencil marks. Don't finalise curves yet, you're just establishing the new positions.
Step 4: Blend and Smooth the Curves
Connect your marked points with smooth, flowing curves. Use a French curve ruler or a flexible curve tool. The curve should match the original pattern's shape, just larger or smaller.
Check that curves flow naturally from one section to the next. An abrupt angle or flat spot signals a blending error. Smooth curves ensure the garment drapes correctly.
Pay special attention to armholes and necklines. These curves are critical to fit. A slightly off armhole creates a garment that pulls and twists.
Trace over your pencil marks with a permanent marker or pen once you're satisfied with the curves.
Step 5: Test Your Graded Pattern
Cut your graded pattern from paper. Lay it against your original pattern. The pieces should look proportionally larger or smaller, not distorted.
Pin your paper pattern to fabric and cut a test garment in a similar weight. Sew it together using the graded pattern. Try it on and assess the fit.
Look for these signs of successful grading:
- Seams sit where they should
- Armholes feel comfortable
- Neckline doesn't pull or gape
- Length is correct
- Waist sits at your natural waist
If fit issues remain, adjust your increments and grade again. This iterative process refines your grading until the fit is perfect.
Common Grading Mistakes to Avoid
Most grading errors stem from inconsistent increments or poor curve blending. Avoid these pitfalls:
Uneven increments across pieces. If you add 5cm to the front bodice but only 3cm to the back, the garment twists. Every piece must grade by the same amount.
Grading seam allowances. Seam allowances stay the same across all sizes, typically 1.5cm or 2cm. Only grade the actual pattern piece, not the allowance beyond it.
Ignoring darts and shaping. Darts control fit. When you grade, darts must move proportionally. A dart positioned 10cm from the side seam on size 12 should move 2.5cm further on size 14 (if your increment is 2.5cm).
Rushing curve blending. Curves are where fit lives. A bumpy, uneven curve creates a garment that doesn't drape smoothly. Spend time perfecting curves with a French curve ruler.
Skipping the test. Grading theory is sound, but every pattern behaves differently. Always test your graded pattern on fabric before cutting your final garment.
Forgetting facing and interfacing pieces. Grade these too. A facing that doesn't match the bodice size creates binding and puckering at necklines and armholes.
Grading your own sewing patterns unlocks custom fit without buying multiple sizes or settling for poor-fitting garments. The process requires precision and patience, but the reward is garments that fit your body perfectly. At Fabric Mouse, we stock the tools you need to grade with confidence, from the Prym ruler to quality rotary cutters. Start with one pattern, test thoroughly, and you'll soon have a collection of perfectly graded patterns ready for any project. Contact us for expert advice on pattern grading tools and techniques tailored to your sewing style.
Frequently Asked Questions
What does grading between sewing pattern sizes actually mean?
Grading means systematically enlarging or reducing a sewing pattern whilst maintaining its proportions and design integrity. Rather than simply scaling a pattern uniformly, grading adjusts seam lines, darts, and armholes at different rates to create a properly fitted garment across multiple sizes. This ensures that a size 12 doesn't just look like a stretched size 10, but has its own balanced proportions. Most commercial patterns already come in graded sizes, but home sewists often need to grade patterns up or down by one or two sizes for a custom fit.
How do you grade a sewing pattern for a larger bust without distorting the fit?
A full bust adjustment spreads the extra width across the pattern systematically. Divide the total bust increase needed (usually 2.5-5cm per size) between the front and back pieces, then add half to each side seam. Adjust the armhole depth proportionally and extend dart lengths by 1-2cm. The key is distributing the increase evenly so the garment remains balanced. Mark your adjustments clearly using a ruler or measuring tool like the Prym ruler (£3.50), which has precise centimetre scales ideal for pattern work.
What's the best way to check that your graded pattern will actually fit before cutting fabric?
Make a test garment, called a muslin or toile, from inexpensive fabric first. Cut and sew your graded pattern exactly as you would the final garment, then try it on. This reveals fit issues that measurements alone cannot catch, such as armhole placement or sleeve length. Mark any adjustments directly on the muslin, then transfer those changes back to your paper pattern before cutting your final fabric. This single step prevents wasted expensive fabric and saves hours of unpicking.
Can you grade a sewing pattern at home without specialist software?
Yes. You need only paper, a ruler, a pencil, and basic measuring tools. The Olfa 45mm rotary cutter (£14.00) is excellent for cutting pattern pieces cleanly, and a flexible ruler helps you blend curves smoothly. Plot your grading points using a ruler, then connect them with a smooth curve using a French curve or by hand. Many experienced home sewists grade patterns entirely by hand using traditional methods. Specialist grading software exists but is not necessary for adjusting one or two sizes for personal use.
Related Posts

How to Fix Gaping Armholes in Dresses: 7 Methods

How to Sew a Professional Tailored Collar

What Is the Purpose of a Walking Foot?

Sewing Machine Needle Types Explained

Lightweight Sewing Machine: A 2026 Review

Doctor Who Fabric Guide: Types, Prints & Projects
