

Choosing Embroidery Software for Beginners: A Practical Guide
Last Updated: November 4, 2026
Quick Summary
Choosing the right embroidery software starts with your machine, not the software itself. Write down the file formats your machine accepts and its largest design area first, as these two facts eliminate half the market immediately. Software becomes necessary when you want to create or edit designs rather than select them.
- Beginners do not need software at first, as built-in designs and on-screen editing cover far more than expected.
- Digitising software converts artwork into stitches, while editing software adjusts designs that already exist.
- Save your master file in an editable format and export a DST copy for stitching.
- USB stick is the most reliable transfer method for most machines and the one we recommend for beginners.
- For a hobbyist stitching a few projects a month, a perpetual licence almost always wins on total cost.
Table of Contents
- Start With Your Machine, Not the Software
- Do Beginners Actually Need Embroidery Software?
- Embroidery Digitising Software vs Editing Software
- Embroidery Machine File Formats Explained
- Embroidery Software Compatibility: Operating Systems and Hardware
- Free Embroidery Software: What It Covers and Where It Stops
- Subscription or Perpetual Licence: The Long-Term Cost
- Matching Software to Machines in the Fabric Mouse Range
- Common Beginner Errors and How to Avoid Them
- Book a Demonstration Before You Buy
- Frequently Asked Questions
Start With Your Machine, Not the Software
Most beginners choose embroidery software the wrong way round. They read a list of features, pick the package that sounds most capable, then discover their machine will not open the files it saves. The software can be fine and the machine can be fine, yet the two simply do not speak the same language. Choosing the right embroidery software for beginners starts with the machine already on your table, not the box on the shelf.
So before you look at any package, write down two things: the file formats your machine accepts, and the largest design area it can stitch. Those two facts eliminate half the market immediately.
A machine such as the Brother Innov-is M340e embroidery machine has a 100 x 100mm embroidery area, which tells you straight away that software designed around much larger hoops will create designs you cannot stitch without splitting them. Check your own manual or the manufacturer's support pages for the exact format list before you spend anything.

Do Beginners Actually Need Embroidery Software?
No, not at first. A modern embroidery machine will keep a beginner busy for months without a computer involved. Software becomes necessary when you want to create or edit designs rather than select them.
What the Machine Already Does on Its Own
Built-in designs, lettering fonts and on-screen editing cover far more than most people expect. The Brother F580, for example, carries 193 built-in embroidery patterns and 13 embroidery fonts, with on-screen tools to flip, rotate and repeat designs and text. That is genuine creative control, no computer required.
Where the machine stops is at original artwork. Turning a photograph, a logo or your own drawing into stitches is the job of embroidery software, and no built-in library replaces it.
Embroidery Digitising Software vs Editing Software
Digitising software converts artwork into stitch instructions. Editing software adjusts designs that already exist. They are different jobs, and many beginners buy the wrong one.
Embroidery digitising software is the tool that translates a vector graphic or raster image into stitches: it decides stitch types, stitch density, underlay and the running order. Editing software opens an existing design file and lets you resize, recolour, add lettering or merge elements. Some packages do both; budget options usually lean heavily towards editing.
If your plan is to personalise gifts with names and ready-made motifs, editing is enough. If you want to stitch your own artwork, you need digitising, and that is where the learning curve steepens. Auto-digitising tools handle simple shapes reasonably well; manual digitising gives you control over stitch density and stitch types, and it takes practice to learn.
Embroidery Machine File Formats Explained
A file format is the container that carries stitch instructions from computer to machine. Get this wrong and nothing else matters.
The main formats you will meet are PES, DST, JEF and DSB, plus FCM for compatible Brother ScanNCut workflows. PES is Brother's editable format and carries design objects as well as stitch data. DST is the industry-standard stitch file: universal, but it carries stitch data only, so it cannot be edited back into objects. JEF serves Janome machines. The EOC06 imports designs via USB in DST or DSB format.
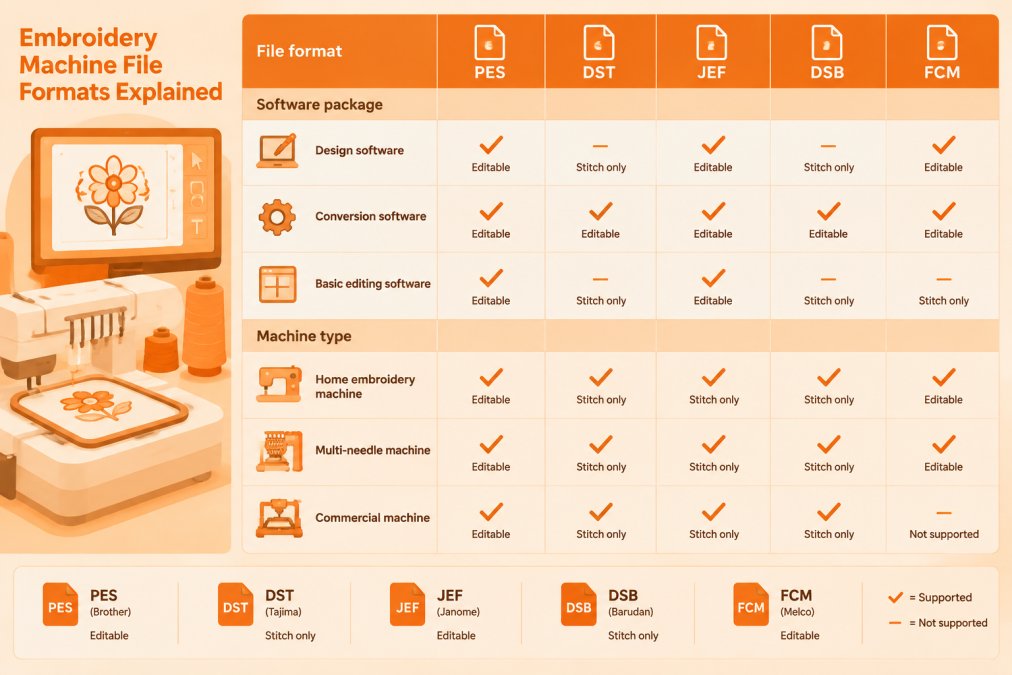
Our advice: save your master file in the editable format your software uses, and export a DST copy for stitching. DST opens almost anywhere. If you are weighing up a Janome machine, check its accepted formats on the Janome Memory Craft 550e embroidery machine listing before committing to a software package.

The Transfer Step Nobody Warns You About
Most beginner frustration happens after the design is saved, not before. The file has to get from your computer to the machine, and the route matters.
USB stick is the most reliable method for most machines and the one we recommend for beginners. Copy the exported file to a USB stick formatted as FAT32, eject it properly, then insert it into the machine's USB port. Some machines read only from the root directory, not from folders, so keep the stick tidy.
Direct cable connection works on some models but is fussier: the cable must be a data cable, not a charge-only cable, and the software must list your exact machine as supported. Wi-Fi transfer exists on some newer machines but adds a network setup step that beginners rarely need.
Watch out: a file that opens on your computer but shows as unsupported on the machine is almost always the wrong format for that model, not a corrupt file. Re-export in the format listed in your manual before assuming the software is faulty.
Machine Memory and Hoop Limits
The file also has to fit. Entry-level machines have limited internal memory and a fixed hoop size, so a design that is technically valid can still be rejected because it is too large or too complex. A machine with a 100 x 100mm hoop cannot stitch a design built for a 200 x 200mm hoop without splitting it into sections.
Check two numbers before you design: the maximum stitch count the machine will accept in one file, and the largest design area. Both are in the manual. If your software lets you set a hoop size, set it to match your machine so it warns you before you export.
When the Software Will Not Recognise Your File
A common beginner error is opening a DST file in editing software and expecting to change stitch types. DST carries stitch data only, so it opens as a fixed path. If you need to edit, go back to the PES or native master file.
If the software will not open a file at all, check the file extension first, then the software's supported-format list, then whether the file was saved by a newer version of the software than you own. Version mismatch is a frequent cause and is fixed by exporting to an older format or updating the software.
Embroidery Software Compatibility: Operating Systems and Hardware
Compatibility is where beginners lose the most time, and it is rarely mentioned in software marketing. Three things need to line up: your operating system, your connection method, and your machine's file support. Most guides stop at the first two. The third is where the money is wasted.
Operating system first. Brother PE-Design Plus 2 and PE-Design 11 both support Windows 11, and Brother publishes current system requirements on its support pages.
Hardware second. Some packages require a physical USB key to run, so a laptop with limited ports needs planning. Others transfer designs by USB stick, which is the most reliable route for most machines.
Brother PE-Design Plus 2 Embroidery Software →
Watch out: buying a package before confirming it runs on your computer is the single most common beginner error we hear about. Check the manufacturer's requirements page, not the retailer's summary. If you are connecting a computer directly to a machine, the correct Janome software USB cable is the part that trips people up, because a charge-only cable will not transfer data.
The Ecosystem Gap: Match Software Tier to Machine Capability
This is the part competitors skip, and it is the reason beginners regret purchases. Software is not just compatible or incompatible with a machine; it is matched or mismatched to what the machine can actually stitch.
A machine with a small hoop and modest memory cannot use the advanced features of a top-tier package. You can buy the most capable software on the market, but if your machine only accepts a 100 x 100mm design area, the multi-hoop splitting tools and large-format templates will sit unused. Conversely, a beginner who buys only basic editing software may find it cannot export the stitch density controls needed to resize a design for a different fabric.
A practical way to map it: list your machine's hoop size, maximum stitch count per file, and accepted formats. Then check the software's export options against that list. If the software's headline features depend on a larger hoop or a format your machine does not read, it is the wrong tier for you, however good the reviews.
Connection Method and What It Means for Your Workflow
The transfer route shapes how you work day to day. USB stick is the most reliable for most machines and the easiest to troubleshoot. Direct cable is convenient if the machine sits next to the computer but depends on a data cable and a supported model. Wi-Fi, where available, removes the cable but adds network setup and is rarely worth the complexity for a beginner stitching a few projects a month.
Whichever route you use, test it with one small design before you rely on it for a gift with a deadline. A five-minute test stitch-out tells you more about compatibility than any specification sheet.
Free Embroidery Software: What It Covers and Where It Stops
Free embroidery software is genuinely useful, and we would never talk a beginner out of starting there. It typically covers format conversion, basic resizing, simple lettering and viewing designs before you stitch them.
Where free tools stop is at the work that matters most. Manual digitising, stitch density control, appliqué tools and multi-colour management are almost always paid features. Free packages also tend to lag on new operating systems and offer limited technical support when a file will not open.
A sensible path: use free software to learn what files are and how designs behave, then buy once you know what you actually need. That way the purchase is informed rather than hopeful.
Subscription or Perpetual Licence: The Long-Term Cost
This is the decision competitors gloss over, and it is the one that costs beginners the most money over time.
A perpetual licence is a one-time purchase. You own that version indefinitely, and it keeps working on the machine it was installed on. The trade-off is that major upgrades usually cost again. A subscription spreads the cost monthly and typically includes updates, but payments never stop, and if you cancel you lose access.
For a hobbyist stitching a few projects a month, a perpetual licence almost always wins on total cost. For someone running a small embroidery business who needs current features and support, a subscription can justify itself. Work out the three-year total before deciding, not the monthly figure.
Our range includes several one-time purchases: Brother PE-Design Plus 2 at £399.00, Brother PE-Design 11 at £1,099.00, and the mySewnet Embroidery 2021 Platinum Upgrade at £925.00. Check current pricing and system requirements on each listing before buying.
| Software | Price | Licence | Best For |
|---|---|---|---|
| Brother PE-Design Plus 2 | £399.00 | Perpetual | First digitising steps |
| mySewnet Embroidery 2021 Platinum | £925.00 | Perpetual | Full creative control |
| Brother PE-Design 11 | £1,099.00 | Perpetual | Serious design work |
Matching Software to Machines in the Fabric Mouse Range
The practical answer is to match the software tier to the machine's capability, and our own range makes that easier to see than most.
For a compact beginner machine, PE-Design Plus 2 is a sensible entry point: 287 built-in designs, 35 fonts and PhotoStitch, on Windows. Step up to the Brother F580 sewing and embroidery machine, which carries 193 built-in patterns, and PE-Design 11's 1,000 designs and 130 fonts start to make sense.

Best for: beginners who want to grow into digitising without replacing their first purchase. Skip if: you only ever want to resize and recolour built-in designs, where free software will do.
Common Beginner Errors and How to Avoid Them
The same handful of mistakes appear again and again, and every one is avoidable.
- Buying software before checking the machine's accepted file formats
- Assuming a free trial includes digitising when it only covers editing
- Resizing a finished design without adjusting stitch density, which causes puckering
- Saving only in DST and losing the editable master file
- Ignoring hoop size, then designing work too large to stitch in one pass
- Skipping the manual, then blaming the software when a USB key is required
The fix for most of these is a single habit: test one small design end to end, from software to stitch-out, before you commit to a workflow. If the result puckers or the colours run out of order, you have found the problem while it is still cheap to solve.
Book a Demonstration Before You Buy
Software can be easier to judge in person than on a specification sheet, and a demonstration can help with that. Contact us before travelling so we can confirm the model you want to see is available to demonstrate, and bring a sample of the artwork you would like to stitch.
If you need help using the machine once you own it, individual lessons with Stuart are available by arrangement. We also offer a free printable Sewing Room Starter Set, which includes hooping help and tension troubleshooting sheets.
Frequently Asked Questions
Do beginners need embroidery software?
Not straight away. Many machines in our range include built-in designs and fonts, so you can start stitching without software. Software earns its place when you want to resize a design, add lettering, combine motifs or bring in your own artwork. If you are still learning hooping and stabiliser, the built-in library will keep you busy for months before embroidery software adds anything you cannot already do.
What is the difference between embroidery editing and digitising software?
Editing software opens an existing design and lets you resize, rotate, recolour, merge lettering and rearrange stitch order. Digitising software goes further: it turns vector graphics or raster images into stitch files, with control over stitch types such as satin, fill and run stitch, plus stitch density and underlay. Brother PE-Design Plus 2 covers design editing and an introduction to digitising, while Brother PE-Design 11 adds the fuller toolset for creating designs from scratch.
Is there free embroidery software for beginners?
Yes, and it is a sensible first step. Free tools and trial versions let you test whether you enjoy the editing side before spending anything. The catch is usually the ceiling: limited file formats, fewer editing tools, no manual digitising and little technical support. Use free embroidery software to learn the interface and decide what you actually miss, then buy once you know which feature you keep reaching for. Our free Sewing Room Starter Set includes hooping help and a stabiliser guide to pair with it.
How do I know whether embroidery software is compatible with my machine?
Check two things: the file format your machine reads, and the computer the software runs on. The EOC06 imports DST or DSB files via USB, and Brother machines work with PES and related formats. On the computer side, both Brother PE-Design packages list Windows 11 support and the software USB key is required for use. Visit support.brother.com, enter your model, and confirm its compatible accessories and formats before buying, or contact Fabric Mouse and we will check it with you.
Choosing embroidery software is a decision about your machine, your formats and your budget, in that order. Fabric Mouse can help you work through all three: we stock Brother and Poolin embroidery machines, keep PE-Design and mySewnet software, and our team will check file compatibility with your model before you commit. Get in touch with Fabric Mouse and choose software that fits the machine you already own.

How to Troubleshoot Sewing Machine Tension Problems
How to Sew with Cotton Jersey Fabric: A Practical Guide
Related Posts

How to Adjust Sewing Patterns for a Full Bust

How to Calculate Fabric Yardage for Beginners

How to Clean and Oil Your Embroidery Machine Properly

How to Sew with Cotton Jersey Fabric: A Practical Guide

How to Troubleshoot Sewing Machine Tension Problems

What Happens When a Sewing Machine Needle Breaks
