

How to Use Quilting Rulers for Beginners
Table of Contents
- What You'll Need Before You Start
- Understanding Different Types of Quilting Rulers
- Quilting Ruler Measurements Explained
- How to Use a Quilting Ruler with a Rotary Cutter
- Positioning Your Fabric and Ruler Correctly
- How to Stop a Quilting Ruler Slipping
- Common Mistakes to Avoid
- Using Quilting Rulers with Your Machine
- Frequently Asked Questions
Last Updated: 20 October 2026
What You'll Need Before You Start
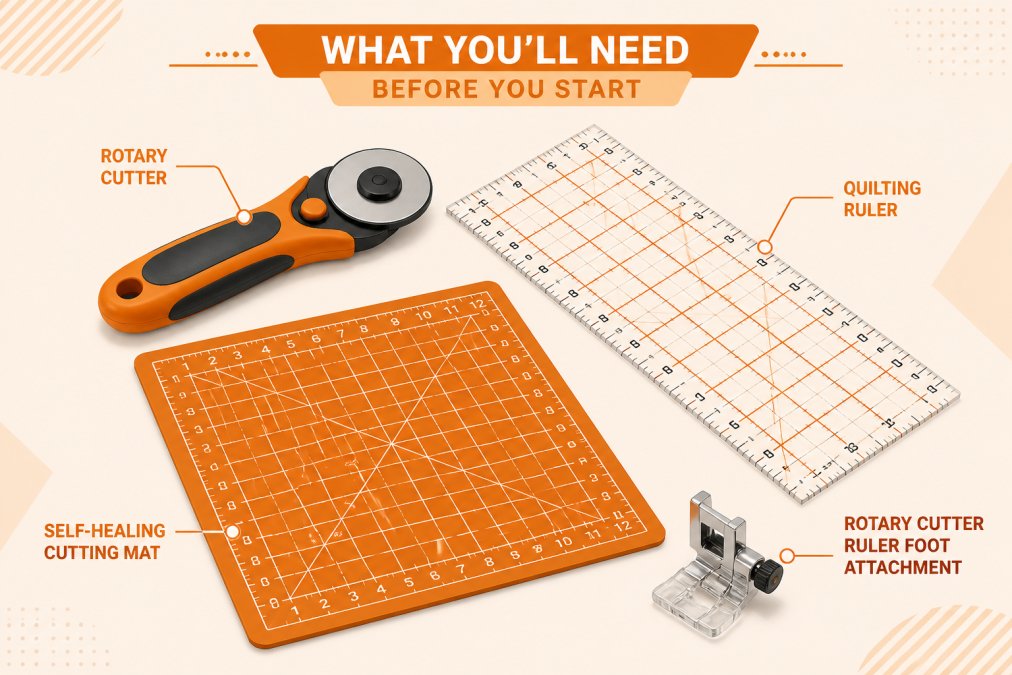
Before you dive into quilting with rulers, gather the essentials. You'll need a rotary cutter, a self-healing cutting mat, and quilting fabric. A clear quilting ruler is non-negotiable; this is your guide for straight, accurate cuts.
At Fabric Mouse, we recommend starting with a quality ruler set. The Janome Ruler Work Kit - Six Ruler Set (£87.00) gives you multiple ruler shapes to explore different quilting techniques. It includes six different templates plus a marking tool and instructional DVD, so you understand how each ruler works before you commit to buying individually.

You'll also want a ruler foot for your machine. This attachment holds your ruler steady while you stitch. Brother machines use either the Brother High-Shank Ruler Foot F088 (£36.99) or the Brother Low-Shank Ruler Foot F089 (£36.99), depending on your model. Janome users can opt for the Janome Ruler Work Foot QR (£21.00).


Check your machine manual to confirm which foot fits. Getting this wrong wastes time and money.
Understanding Different Types of Quilting Rulers
Quilting rulers for beginners come in several shapes, each designed for a specific job. Understanding the difference saves you from buying rulers you'll never use.
Square Rulers
Square rulers are the workhorse of quilting. They range from 6x6 inches to 15x15 inches. Most beginners start with a 6x6 or 9x9 inch square.
Use square rulers for cutting fabric into blocks and trimming finished blocks to size. They're also perfect for squaring up corners and checking that your seams are straight. The grid lines printed on the surface help you align fabric edges precisely.
A 12x12 inch square ruler handles larger projects. But start small; a 6x6 square ruler teaches you the fundamentals without overwhelming you with options.
Strip Rulers
Strip rulers are long and narrow, typically 2 to 6 inches wide and 12 to 24 inches long. They're designed for cutting strips of fabric quickly and accurately.
If you're making a quilt with strips, this ruler is essential. Line it up on your fabric, run your rotary cutter along the edge, and you get a perfectly straight strip. The width markings on the ruler let you cut multiple strips of identical width without measuring each one individually.
Many beginners skip strip rulers at first. But once you make your second quilt, you'll understand why they're worth having.
Specialty Rulers
Specialty rulers handle specific shapes: triangles, hexagons, curves, and ovals. The Janome Ruler Work Kit - Six Ruler Set includes specialty templates like pointed ovals and clam shells.
These rulers are fun but optional for beginners. Master square and strip rulers first. Specialty rulers become valuable once you're comfortable with basic quilting ruler techniques.
Quilting Ruler Measurements Explained
Quilting rulers use imperial measurements: inches and fractions of an inch. The grid lines on your ruler show 1-inch squares, with thinner lines marking half-inches (1/2 inch) and quarter-inches (1/4 inch).
The 1/4-inch line is crucial for quilting. Most quilt patterns assume a 1/4-inch seam allowance. If you can't cut accurately to 1/4 inch, your pieces won't fit together properly.
Look for rulers with bold, easy-to-read numbers. Thinner lines should be easy to see without squinting. Some rulers have a coloured tint (often yellow or grey) that makes grid lines stand out against fabric.
The diagonal lines on square rulers help you cut triangles and diamonds. Align the diagonal with the edge of your fabric, and you'll cut perfect 45-degree angles every time.
How to Use a Quilting Ruler with a Rotary Cutter
Position your ruler on the fabric where you want to cut. Align the ruler edge with the line you need to cut. Press down firmly on the ruler with one hand, keeping fingers away from the edge.
Hold your rotary cutter in the other hand. Start at the bottom of the ruler and roll the cutter upward in one smooth motion. Don't stop halfway; one continuous stroke gives a cleaner cut than multiple passes.
The rotary cutter blade glides along the ruler edge. It cuts through fabric and batting in a single pass. Never apply extra pressure; let the blade do the work.
A common mistake is lifting the ruler while the blade is still touching fabric. This causes the blade to wander and ruins your cut. Keep the ruler pressed down until your cutter has completely passed the edge.
For how to use a quilting ruler with a rotary cutter safely, always cut away from your body. If the blade slips, it moves away from you, not towards your hand.
Positioning Your Fabric and Ruler Correctly
Lay your fabric flat on a self-healing cutting mat. Smooth out wrinkles and bunches. A bumpy surface leads to crooked cuts.
Position the ruler so the edge you want to cut aligns with a grid line on the ruler. Look at the ruler from directly above, not at an angle. Angles make it hard to see if you're lined up properly.
Press the ruler down with your palm and fingers spread flat. Use your body weight, not just hand strength. This keeps the ruler stationary while you cut.
For quilting rulers for beginners, start with simple straight cuts across the grain. Once you're comfortable, try diagonal cuts and more complex angles.
Janome Ruler Work Kit – Six Ruler Set →
Check your cut before moving on. If the edge is crooked, you've either moved the ruler or applied uneven pressure. Adjust your technique and try again on a fresh piece of fabric.
How to Stop a Quilting Ruler Slipping
A slipping ruler ruins your cut and wastes fabric. Prevent this with proper technique and the right tools.
First, press down hard. Many beginners use too little pressure. Your palm should feel like it's holding the ruler in place through sheer force.
Second, use a ruler with a non-slip backing. Some rulers have a sticky surface on the underside that grips fabric. Others have a textured finish. These cost more but are worth it for accuracy.
Third, keep your cutting mat clean. Dust and lint on the mat reduce friction. Wipe your mat regularly with a damp cloth.
Fourth, don't move your hand while cutting. Keep fingers flat and still. Any shift in hand position shifts the ruler.
If your ruler keeps slipping despite good technique, consider a ruler gripper, a thin rubber pad that sits between the ruler and fabric. It provides extra grip without damaging fabric.
Common Mistakes to Avoid
Most beginners make the same errors. Learn from them now and save yourself frustration.
Pressing too lightly: You need firm, steady pressure. Light pressure lets the ruler shift. Use your whole hand, not just fingertips.
Rushing the cut: A slow, smooth stroke beats a fast, jerky one. Speed leads to wobbles and crooked lines.
Cutting the same line twice: Once you've cut, move on. A second pass over the same line wastes fabric and dulls your blade faster.
Using the wrong ruler for the job: A strip ruler won't give you accurate squares. A square ruler struggles with long strips. Use the right tool.
Forgetting to check your seam allowance: If your pieces don't fit together, check your 1/4-inch seam allowance first. Most fitting problems start here.
Not replacing your rotary cutter blade regularly: A dull blade tears fabric instead of cutting cleanly. Replace it when cuts become ragged.
Using Quilting Rulers with Your Machine
Once you've cut your pieces, your machine does the stitching. But quilting rulers for beginners extend to machine work too.
A ruler foot lets you guide the ruler along the fabric while your machine stitches. This creates perfectly straight quilting lines or decorative patterns. The foot holds the ruler steady so you can focus on moving fabric smoothly.
Check your machine manual for the correct ruler foot. Brother machines need the high-shank or low-shank foot depending on your model. Janome machines use the Janome Ruler Work Foot QR.
Install the foot according to your machine's instructions. Attach your ruler to the foot using the guides provided. Test on scrap fabric first; you want to see how the machine handles ruler-guided stitching before working on your quilt.
Move the fabric smoothly under the needle. Let the ruler guide your path, but you control the speed. Most beginners move too fast. Slow, steady movement gives better results.
Practise on scrap fabric until you feel confident. Ruler-guided stitching takes coordination, and practice builds muscle memory.
Learning quilting rulers for beginners opens up a whole world of possibilities. Straight cuts, accurate blocks, and professional-looking quilts become achievable with the right technique and tools. Start with a quality square ruler, master the basics, and build your collection as your skills grow. At Fabric Mouse, we stock ruler feet for all major machine brands and ruler sets to get you started. Our team can help you choose the right accessories for your machine and guide you through your first projects. Contact us for expert advice on quilting rulers and find the equipment that works for your style.
Frequently Asked Questions
How do you use a quilting ruler with a rotary cutter?
Place the quilting ruler on your fabric, aligning the measurement line with the fabric edge you want to cut. Hold the ruler firmly with one hand, keeping fingers away from the cutting line. Use your rotary cutter with the other hand, rolling it away from your body along the ruler's edge. Apply steady, even pressure and cut in one smooth motion. Never lift the cutter mid-cut, as this can cause uneven edges.
What quilting ruler should a beginner start with?
The Janome Ruler Work Kit offers a six-piece set at £87.00, providing multiple ruler shapes so you can explore different quilting techniques as your confidence grows. For individual rulers, a versatile square ruler is a good starting point for squaring up blocks and cutting larger pieces.
How do you stop a quilting ruler slipping?
Apply firm, even pressure with your fingers spread across the ruler's surface; avoid gripping just one edge. Keep your rotary cutter sharp; dull blades require more pressure, which can shift the ruler. Consider using a ruler gripper, a thin rubber pad that sits between the ruler and fabric, for extra grip.
Can you use a quilting ruler without a rotary cutter?
Yes, you can use a quilting ruler with scissors or a sharp craft knife, though a rotary cutter gives straighter, more consistent cuts. If using scissors, hold them at a slight angle and cut slowly along the ruler edge. For machine quilting, you'll use a ruler foot instead of a rotary cutter; the ruler guides the presser foot while you stitch decorative lines or free-motion quilting patterns.
Related Posts

Types of Premium Cotton for Quilting

Why Bobbin Thread Bunches Up: Fix It Now

How to Grade Sewing Patterns for Custom Fit

How to Fix Gaping Armholes in Dresses: 7 Methods

How to Sew a Professional Tailored Collar

What Is the Purpose of a Walking Foot?
