

Sewing Machine Repair Service: Your Guide
Table of Contents
- When Your Sewing Machine Needs Professional Repair
- Sewing Machine Needle Breakage: Causes and Prevention
- Troubleshooting Sewing Machine Tension Issues
- How to Clean a Sewing Machine Between Services
- What to Expect From Professional Sewing Machine Repair
- Preparing Your Machine for Service or Repair
- Warranty Repairs: What's Covered and What Isn't
- Preventative Maintenance to Avoid Costly Repairs
- Frequently Asked Questions
Last Updated: September 27, 2026
When your sewing machine needs professional repair, knowing what to expect can ease the worry. A broken needle, tension problems, or sluggish stitching can halt a project mid-flow. The good news: most issues are preventable with proper care, and when repair becomes necessary, a qualified sewing machine repair service can get you back to creating quickly.
At Fabric Mouse, we've been servicing and repairing all brands of machine since 1922. Our authorised sewing machine repair service handles everything from routine maintenance to complex mechanical fixes. This guide covers the most common problems, how to prevent them, and what happens when your machine needs professional attention.
When Your Sewing Machine Needs Professional Repair
Your machine tells you when something's wrong. Skipped stitches, thread bunching, unusual noises, or a needle that won't move are all red flags. Some problems you can fix yourself. Others require an engineer's expertise.
The difference comes down to whether the issue is user-related or mechanical. A tension problem might be as simple as rethreading. A bent hook or damaged timing mechanism is not. If you've checked the basics and the machine still misbehaves, professional repair prevents further damage.
Fabric Mouse offers Machine Servicing & Repairs at £70.00, with your machine ready for collection within 2-3 weeks. We also handle Parts Repairs for specific component issues at £40.00. You can drop off your machine any weekday between 10am-3.30pm, or post it securely in its original packaging.

Sewing Machine Needle Breakage: Causes and Prevention
Needle breakage is the most common complaint. A broken needle stops stitching instantly and can damage the needle plate or hook if fragments lodge inside. Understanding why needles break helps you avoid it.
The five main causes are straightforward: incorrect needle insertion, a bent needle already in the machine, using the wrong needle type for your fabric, hitting a pin mid-stitch, and tension set too tight. Each has a clear fix.
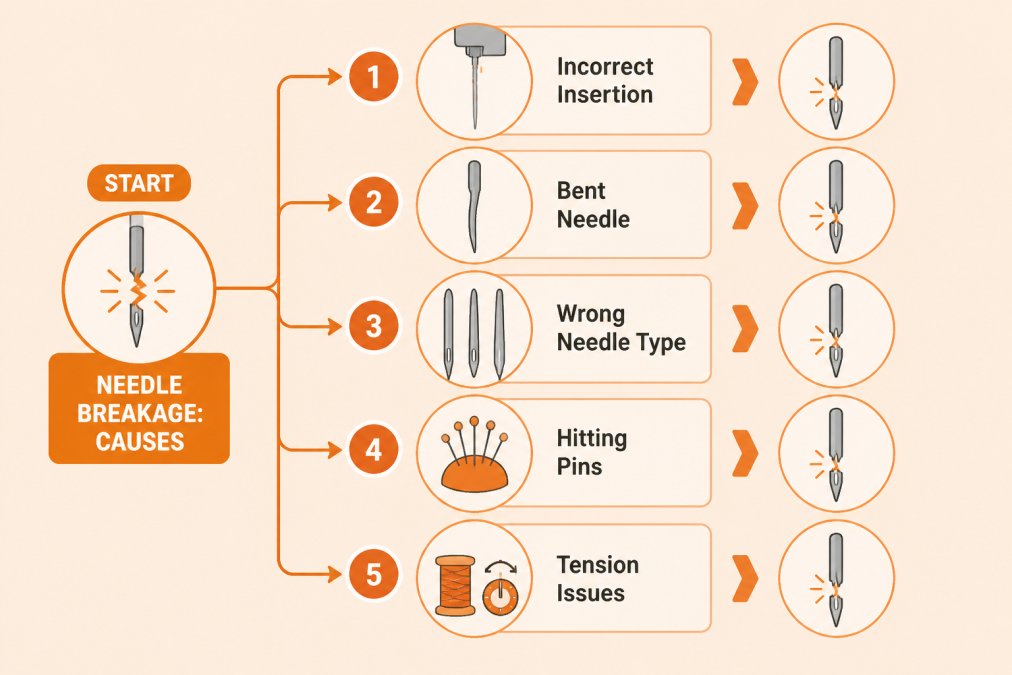
Incorrect insertion is the easiest mistake to make. Most machines require the needle to face a specific direction, flat side forward or backward depending on the model. Check your manual. A needle inserted backwards will hit the presser foot or needle plate and snap.
A bent needle often comes from the previous project. Always inspect before starting. Hold it up to light and look along its length. Even a slight bend will cause breakage once you start sewing. Replace it.
Wrong needle type matters more than many sewers realise. A universal needle works for most woven fabrics, but stretch fabrics need ballpoint needles, and heavy denim demands a jeans needle. Using a universal needle on stretch fabric forces the needle to bend sideways as it penetrates, leading to breakage.
Hitting pins is entirely preventable. Remove pins before they reach the needle. Never sew over a pin, it's not worth the risk. Pins are cheap. Needles and repairs are not.
Tension that's too tight pulls the needle at an angle. If your tension dial is maxed out, the needle flexes with every stitch and eventually snaps. Loosen it gradually until stitches look balanced.
Troubleshooting Sewing Machine Tension Issues
Tension problems create uneven stitches: tight loops on top, loose stitches underneath, or bunched thread. Most sewers assume the tension dial is wrong. Often, it's not.
Before adjusting tension, check these first: Is your needle inserted correctly? Is it the right needle for your fabric? Is your thread wound smoothly on the bobbin? Is your presser foot down? All of these affect stitch quality more than tension itself.
If those are fine, adjust tension gradually. Most machines have a dial numbered 0-9, with 4-5 as the default. Turn it one number at a time and test on scrap fabric. Small adjustments make a big difference.
Top tension too tight creates small loops underneath. Loosen the dial by half or one full number. Top tension too loose creates loops on top. Tighten slightly.
Bobbin tension is trickier. It's set at the factory and rarely needs adjustment. If you must adjust it, use a tiny screwdriver on the screw next to the bobbin case spring. Turn clockwise to tighten, anticlockwise to loosen. Make quarter-turns only. This is where many people go wrong, one full turn of that screw can ruin tension entirely.
If you've adjusted tension and stitches still look wrong, the machine may need professional servicing. A worn hook, misaligned needle plate, or timing issues require an engineer.
How to Clean a Sewing Machine Between Services
Regular cleaning prevents many repairs. Lint and thread bits accumulate inside the bobbin case and feed dogs, clogging the mechanism. Cleaning takes 10 minutes and extends your machine's life significantly.
You'll need a soft brush, compressed air, and lint-free cloths. A Hemline Service Kit includes brushes and screwdrivers designed for the job, costing just £3.00.
Start by removing the presser foot and needle. Open the bobbin case and gently brush away lint. Use compressed air in short bursts to dislodge stubborn bits. Never use a vacuum, the suction can damage delicate springs.
Brush the feed dogs carefully. These teeth move your fabric forward with each stitch. Lint here causes uneven feeding. Use a small, soft brush and brush in the direction the dogs move, not against it.
Wipe the needle plate with a lint-free cloth. If it's sticky from oil or adhesive, dampen the cloth slightly with water. Dry immediately.
Clean the thread guides and tension discs with a cloth. Don't force anything. If lint is stuck, use a thin brush or compressed air.
Never oil your machine unless the manual specifically says to. If you suspect your machine needs lubrication, book a professional service.
What to Expect From Professional Sewing Machine Repair
A professional service is thorough. The engineer disassembles key parts, cleans internal mechanisms, checks timing, tests all functions, and reassembles everything. It's not a quick fix, it's a reset.
Fabric Mouse's full sewing machine repair service includes cleaning, checking tension and timing, testing all stitches, and lubricating where needed. Your machine is with us for 2-3 weeks. We email you when it's ready for collection.
Machine Servicing & Repairs | Sewing →
What you need to bring: your bobbin and bobbin case, your standard presser foot (or embroidery foot if servicing an embroidery machine), your order number or name written on the machine, and any embroidery hoop if applicable. Leave at home: instruction books, extra feet, accessory trays, quilting tables, bags, and your power lead unless it's unique to your machine.
If your machine is under warranty, some repairs may be covered. However, items that wear with use, bobbin cases, needle threaders, needle plates, are not covered. Nor is damage from hitting pins or using the wrong oil. Warranty Repair Booking is free to arrange, but if the fault is simply that your machine needs servicing, you'll be billed for the service itself.

The nature of diagnosing a sewing machine fault means fixing it and testing it. We can't tell you what's wrong until after we've serviced it, unless there's obvious breakage.
Preparing Your Machine for Service or Repair
Preparation speeds up the process and prevents unnecessary charges. Start by writing your name or order number on your machine case with a permanent marker. Include it on your bobbin case and any accessories you're sending.
Test your machine one final time. Note exactly what's happening: "skips stitches on stretch fabric," "makes a grinding noise when I press the foot pedal," "thread keeps breaking." Write this on a sticky note and leave it in the bobbin case. Specific details help the engineer.
Pack your bobbin and bobbin case securely. If you're posting your machine, use the original box if you have it. If not, contact the manufacturer for a replacement box. Machines arriving in damaged packaging void insurance. Wrap the machine in bubble wrap, pad the corners, and tape the box firmly.
If posting, you're responsible for arranging collection. Fabric Mouse doesn't cover postage. Use a tracked, insured service. Keep your receipt.
If dropping off in person, bring your machine any weekday between 10am-3.30pm. No appointment needed. We'll email you when it's ready, usually within 2-3 weeks depending on the queue.
Warranty Repairs: What's Covered and What Isn't
Manufacturer warranties cover defects in materials and workmanship. They do not cover wear and tear, user error, or damage from misuse.
Items explicitly not covered: bobbin cases, bobbins, needle threaders, needle plates, presser feet and accessories, tension and timing adjustments, blades, trimmers, loopers, hook damage from use, accidental damage, damage from wrong oil or lubricant, machines running dry, belts, winders, and bulbs.
The most common misunderstanding: if your machine needs servicing to maintain the warranty, that service is not free. Just as a car warranty requires scheduled servicing, so does a sewing machine warranty. Proper maintenance is your responsibility.
You have 28 days from purchase to report a fault covered by warranty. After that, you'll be charged for diagnosis and repair.
If you're unsure whether your issue is covered, book a Warranty Repair Booking and let the engineer assess it. They'll confirm what's covered before proceeding.
Preventative Maintenance to Avoid Costly Repairs
The cheapest repair is the one you never need. Regular maintenance catches small problems before they become expensive ones.
Clean your machine every 8-10 hours of sewing. Brush lint from the bobbin case and feed dogs. Wipe the needle plate. This alone prevents most common issues.
Change your needle regularly. A needle dulls with use, even if it's not visibly bent. Dull needles skip stitches and can break. Replace it every 8-10 hours of sewing, or sooner if you're working with heavy fabric.
Use the correct needle for your fabric. Universal needles work for most wovens. Ballpoint needles for stretch. Jeans needles for denim. Topstitching needles for decorative work. The right needle prevents breakage and tension problems.
Check your bobbin winding. A bobbin wound unevenly or too tightly causes tension issues. Wind slowly and evenly.
Store your machine in a cool, dry place away from direct sunlight and heat. Extreme temperatures and humidity damage electronics and timing.
Have your machine serviced professionally every 1-2 years, or every 100-150 hours of sewing, whichever comes first.
Keep your manual and original packaging. The manual answers most questions. The original box protects your machine if you ever need to post it for repair.
Frequently Asked Questions
What happens if a sewing machine needle breaks inside the machine?
A broken needle left inside your machine can damage the needle plate, hook, or timing mechanism, causing more expensive repairs. If your needle breaks during sewing, stop immediately, switch off the machine, and carefully remove any visible needle fragments using tweezers. If you cannot safely remove all pieces, bring your machine in for professional inspection. Our authorised sewing machine repair service can diagnose any damage and perform necessary repairs to restore your machine to full working order.
How often should I have my sewing machine serviced?
Regular maintenance prevents needle breakage, tension issues, and thread jams. Between professional services, use a Hemline Service Kit (£3.00) to clean your machine and keep it in top condition. Our team can advise on your machine's specific needs when you bring it in.
Can I fix a jammed sewing machine myself?
Simple jams caused by thread tangles can sometimes be cleared at home by switching off your machine, removing the bobbin, and gently pulling out trapped threads. However, if the jam involves the hook, timing mechanism, or you're unsure what's causing it, professional repair is safer. Forcing a jammed machine risks breaking internal components. Our parts repair service (£40.00) handles these issues quickly, and we'll email you when your machine is ready for collection.
Why is my sewing machine skipping stitches?
Skipped stitches usually result from tension problems, a bent needle, incorrect needle insertion, or a dull needle. Start by replacing your needle with a fresh one suited to your fabric type, then check your tension settings against your manual. If adjusting tension doesn't help, your machine likely needs professional servicing to check the hook and timing. Bring your machine to us for a full service (£70.00) to identify and fix the underlying cause.
A well-maintained sewing machine is a reliable tool that lasts decades. Most problems are preventable with basic care: clean regularly, use the right needles, check tension, and service professionally every couple of years. When something does go wrong, Fabric Mouse is here to help. We've been repairing all brands since 1922. Drop your machine off any weekday, and we'll have it back to you within 2-3 weeks, ready to create.
Choosing a Sewing Machine for Hobbyists: 2026 Guide
Evaluating Fabric Quality When Buying Online
Related Posts

How to Sew Mitered Corners on Hems

Standard Sewing Machine for Free-Motion Quilting: Pros and Cons

How to Use Quilting Rulers for Beginners

Types of Premium Cotton for Quilting

Why Bobbin Thread Bunches Up: Fix It Now

How to Grade Sewing Patterns for Custom Fit

How to Fix Gaping Armholes in Dresses: 7 Methods
