

What Size Quilting Ruler Should a Beginner Buy?
Last Updated: November 15, 2026
Quick Summary
The most useful quilting ruler size for a beginner is a long rectangular ruler around 6.5 × 24 inches, paired with a square ruler in the 9.5 to 12.5 inch range. Those two cover strip cutting, square cutting and block trimming, so there is little need to buy a full set on day one.
- Buy the 6.5 × 24 inch rectangular ruler first, as almost every quilt begins with strips cut from yardage.
- A 24 inch ruler spans most of the roughly 42 inch usable fabric width in a single pass.
- Choose a square ruler at least half an inch larger than your biggest finished block.
- A 6.5 × 24 inch ruler needs a cutting mat of at least 18 × 24 inches to stay fully supported.
- Check that a set includes a ruler of at least 18 inches and a square of at least 9.5 inches.
Table of Contents
- Why Quilting Ruler Size Matters More Than Brand
- Most Useful Quilting Ruler Sizes for a Starter Set
- Best Quilting Rulers for Beginners: What to Buy First
- The Quilting Ruler for Cutting Fabric Strips
- A Square Quilting Ruler for Squaring Quilt Blocks
- Reading Markings and Seam Allowances Accurately
- Ruler Size, Cutting Mats and Workspace Compatibility
- Buying a Set Versus Individual Rulers
- Choosing Your First Quilting Ruler at Fabric Mouse
- Frequently Asked Questions
Why Quilting Ruler Size Matters More Than Brand
Walk into any quilting shop and you will see rows of acrylic rulers in every dimension imaginable. Choosing a quilting ruler size is the first real decision a new quilter faces, and it matters far more than which logo sits in the corner of the plastic.
Quilting rulers look interchangeable. They are not. A ruler that is too short forces you to reposition your fabric mid-cut, and every reposition is a chance for the fabric to shift. A ruler that is too narrow will not span the width of a strip you are cutting. Get the size right and your rotary cutting becomes faster, safer and noticeably more accurate. Get it wrong and you will spend your evenings trimming wobbly edges.
Many new quilters find that the two sizes that do most of the work are the ones they reach for first, and that buying too many small rulers gets in the way. This guide sets out which quilting ruler sizes earn their place in a starter set, how to read the markings, and how to match a ruler to the projects you actually plan to make.
The Two Jobs Every Ruler Has to Do
Every ruler in a quilting kit does one of two jobs. It either cuts fabric from the flat, meaning long strips and rectangles taken from yardage, or it squares up what you have already sewn, meaning trimming blocks and quilt edges to a true 90 degrees.
Those two jobs pull in opposite directions. Cutting long yardage rewards length. Squaring a block rewards a generous, perfectly square corner. No single ruler excels at both, which is why nearly every experienced quilter owns at least one long rectangular ruler and one square ruler. Understand that split and the rest of the buying decision becomes straightforward.
Most Useful Quilting Ruler Sizes for a Starter Set
The most useful quilting ruler sizes for a beginner are a long rectangular ruler around 6.5 × 24 inches and a square ruler in the 9.5 to 12.5 inch range. Those two cover strip cutting, square cutting and block trimming. Everything else is a refinement.
Here is how the common sizes compare in practice:
| Ruler Size | Metric Equivalent | Primary Task | Best For |
|---|---|---|---|
| 6.5 × 24 inch | approx. 16.5 × 61 cm | Strip and yardage cutting | First purchase |
| 6 × 24 inch | approx. 15 × 61 cm | Strip cutting | Slightly narrower grip |
| 9.5 inch square | approx. 24 cm square | Squaring small to medium blocks | Second purchase |
| 12.5 inch square | approx. 32 cm square | Squaring larger blocks | Blocks over 9 inches |
| 22.5 inch square | approx. 57 cm square | Large blocks and quilt edges | Experienced quilters |
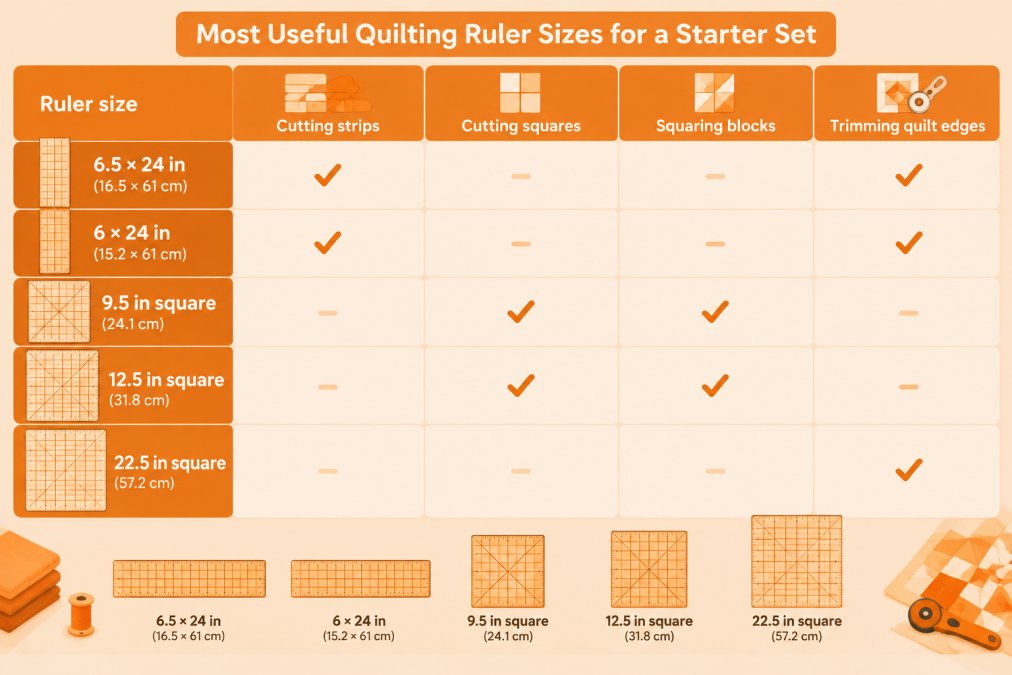
Two rulers will carry you through your first several quilts, so there is little need to buy a full matching set on day one.
Best Quilting Rulers for Beginners: What to Buy First
Buy the long rectangular ruler first. If you can only afford one ruler this month, a 6.5 × 24 inch ruler is the one that unlocks the most techniques, because almost every quilt begins with strips cut from yardage.
The reason is simple maths. Quilting fabric is typically around 42 inches wide once the selvedges are removed. A 24 inch ruler lets you cut a strip in a single pass across most of that width, then walk the ruler along to finish. A 12 inch ruler means two or three passes per strip, and each pass is a chance to misalign.
Here is a quick decision framework for your first purchase:
- You plan to make strip-based quilts: buy the 6.5 × 24 inch first
- You plan to make block-based quilts from fat quarters: buy a 9.5 inch square first
- You genuinely do not know yet: buy the long ruler, then add a square within a month
- You have a small cutting mat under 18 × 24 inches: buy a shorter 6 × 18 inch ruler so it fits the mat safely
Best for: nearly every beginner. Skip if: you only ever work with fat quarters and never cut from full width yardage.
The Quilting Ruler for Cutting Fabric Strips
A quilting ruler for cutting fabric strips needs length, a clear half-inch grid and a straight edge you can trust. The 6.5 × 24 inch size is the standard for good reason: it spans most of the usable fabric width and gives you a generous lip to press your hand against.
Strip cutting is where beginners lose accuracy fastest. The fabric folds, the ruler slips, and the strip ends up a few millimetres wider at one end. A longer ruler reduces the number of times you reposition, which is the single biggest source of drift.
A few habits make strip cutting cleaner:
- Align the ruler's edge with the fabric's straight-of-grain fold, not the selvedge
- Use the ruler's grid lines to check your strip width at both ends before cutting
- Keep steady downward pressure through the middle of the ruler, not the edge
- Cut away from your body with a sharp rotary cutter
Watch out: a blunt rotary cutter blade drags the fabric instead of slicing it, and that drag pulls the strip out of alignment. If your cuts start needing a second pass, change the blade before blaming your technique. If you are unsure how often to swap it, our guide on how long a rotary cutter blade lasts explains the signs to look for.
A Square Quilting Ruler for Squaring Quilt Blocks
A square quilting ruler for squaring quilt blocks should be at least one size larger than the biggest block you plan to make. If your blocks finish at 9 inches (roughly 23 cm), a 9.5 inch square ruler gives you the extra half inch you need to trim all four sides without the ruler edge sitting on the seam you are trying to preserve.
Squaring up is the step beginners skip, and it is the step that decides whether a quilt top lies flat. Pieced blocks rarely come off the machine perfectly square. Trimming each one to an identical size makes the seams line up when you join them, and it is far easier to trim a block down than to stretch one up.
The diagonal line down the middle of a square ruler is the feature that earns its keep. Lay that line along the block's diagonal seam, check that the block's edges sit on the ruler's grid lines, then trim the two exposed sides. Rotate the block a quarter turn, realign the diagonal, and trim the remaining two sides. A square ruler without a diagonal marking is far less useful for this job, which is why the diagonal is worth checking before you buy.
Match the square to the block type you sew most:
- Nine-patch and four-patch blocks: a 9.5 inch square covers most beginner blocks with room to trim
- Half-square triangles: a 12.5 inch square lets you square up a pair of triangles before you trim the finished unit, and the diagonal line aligns with the seam
- Large blocks and medallion centres: a 12.5 inch square is the practical minimum; a 22.5 inch square only earns its place if you regularly piece blocks over 15 inches
- Quilt edges and borders: a long ruler is usually better than a square here, because you are trimming a straight run rather than a corner
Watch out: if you trim a block using the ruler's outer edge as your cut line but align the fabric to a printed line instead, you will shave off the seam allowance and the block will finish small. Always confirm which edge of the ruler is the cutting edge before the first cut.
Best for: anyone piecing blocks from squares or half-square triangles. Skip if: you only make strip-pieced quilts with no block trimming, in which case put the money towards a longer rectangular ruler instead.
Reading Markings and Seam Allowances Accurately
Ruler markings are only useful if you know which line represents the cut and which represents the seam. On most quilting rulers the outer edge is the cut line, and the first printed line inward marks a quarter-inch seam allowance. That distinction trips up new quilters constantly: align fabric to a printed line rather than the ruler's edge and you build the seam allowance into your measurement by accident, so the block finishes smaller than planned.
A quilting ruler carries several sets of markings, and each does a different job:
- The outer edge: the cut line. Your rotary cutter runs along this, not along a printed line.
- The half-inch grid: the main working grid on most rulers, with a finer eighth-inch or millimetre subdivision between the main lines. Use it to check strip width at both ends before you cut.
- The quarter-inch line: the first printed line inward, used for checking seam allowance and for marking a stitching line when you piece without a machine foot guide.
- The diagonal line or lines: used to align a block's diagonal seam when squaring up, and to cut half-square triangles from a strip.
- The angle markings: 30, 45 and 60 degree lines, useful for cutting setting triangles and diamonds.
This is where British quilters hit a practical snag. Most quilting rulers are printed in inches, and most UK patterns and fabric listings mix imperial and metric. A 6.5 × 24 inch ruler is roughly 16.5 × 61 cm, and a 9.5 inch square is roughly 24 cm square, but the printed grid on the ruler will still be in inches. The safest habit is to pick one system for a given project and convert the pattern once, at the start, rather than converting mid-cut. Keep a conversion note taped to your cutting table: 1 inch is 2.54 cm, a quarter inch is roughly 6 mm, and a half inch is roughly 12.7 mm. For strip widths, a 2.5 inch strip is roughly 6.4 cm and a 1.5 inch strip is roughly 3.8 cm.
Our advice is to spend ten minutes with a scrap of fabric and a ruler before you cut anything precious. Cut one strip using the ruler's edge, measure it, then cut another using the first printed line and measure that. Seeing the difference with your own eyes teaches it faster than any diagram. Then cut a strip in metric using the centimetre side of a tape measure and compare it with the same width cut on the inch grid, the small discrepancy is exactly the kind of error that compounds across a quilt.
For a fuller walkthrough of the markings, our guide on how to use quilting rulers for beginners covers the grid, the diagonal lines and the seam allowance markings step by step.
Ruler Size, Cutting Mats and Workspace Compatibility
A ruler that overhangs your cutting mat is a safety problem, not just an inconvenience. The unsupported end tips, the ruler rocks, and the rotary cutter can jump.
Before buying any quilting ruler size, measure your mat. A 6.5 × 24 inch ruler needs a mat at least 18 × 24 inches to sit fully supported during a full-width strip cut. If your mat is smaller, size the ruler down rather than letting it hang over the edge.
Workspace matters too. A long ruler needs clear bench space behind and in front of the mat so you can walk the ruler along without lifting it. On a narrow table, a shorter ruler used in two passes is safer than a long one used badly.
Storage is the last piece. Rulers left leaning against a wall or stacked under fabric can warp, and a warped ruler will never give you a straight cut. Hang them on a pegboard or stand them on edge in a rack. If you are also working out how to keep your fabric tidy, our advice on storing quilting fabric without creasing it pairs well with a proper ruler rack.
Buying a Set Versus Individual Rulers
Sets look like better value, and sometimes they are. Often they are not. Many starter sets bundle three or four small rulers that overlap heavily, leaving you without the one long ruler you actually need.
Compare the contents against this checklist before you buy:
- Does the set include a ruler of at least 18 inches in length?
- Does it include a square of at least 9.5 inches?
- Are the sizes genuinely different, or near-duplicates?
- Are the markings printed in a colour you can read against your fabric?
- Does each ruler fit your cutting mat without overhang?
If a set ticks the first two boxes and avoids duplication, it can save you money. If it is four variations on a 6 inch ruler, buy individually instead. Individual buying also lets you add sizes as your projects demand them, which is how most quilters build a collection that actually gets used.
One insider point: the value of a set is not the number of rulers, it is the range of tasks covered. Two well-chosen rulers beat six that all do the same job.
Choosing Your First Quilting Ruler at Fabric Mouse
Choosing your first quilting ruler comes down to two questions: what will you cut most, and what does your mat allow? Answer those and the size picks itself.
At Fabric Mouse we stock quilting rulers and the rotary cutters, mats and threads that go with them, and we are happy to talk through which size suits the quilts you have in mind. If you are planning to visit, contact us first to check what is available to look at. Once you have your ruler, our beginner quilting patterns, step by step, will give you something to put it to work on straight away.
The gap between a quilt that lies flat and one that ripples usually comes down to cutting accuracy, and cutting accuracy starts with the right ruler in your hand. Fabric Mouse is a family-run sewing-machine shop and showroom in Brompton on Swale, North Yorkshire, offering machines, fabric and sewing supplies, with servicing and repairs across machine brands and individual help with your sewing machine available by arrangement.
Frequently Asked Questions
What size quilting ruler should a beginner buy?
Start with a 6.5 x 24 inch (approximately 16.5 x 61 cm) long ruler for cutting strips and yardage, plus a 12.5 inch (approximately 31.75 cm) square ruler for trimming blocks. These two cover most beginner projects. Add smaller squares later as your block sizes settle. If you can only buy one, choose the long ruler: it handles the widest range of cutting tasks and is the size most quilting patterns assume you own.
What are the most useful quilting ruler sizes?
The most useful quilting ruler sizes are a 6.5 x 24 inch long ruler, a 12.5 inch square ruler and a 9.5 inch square ruler. The long ruler cuts strips and yardage; the 12.5 inch square trims most blocks and quilt edges; the 9.5 inch square suits smaller blocks and half-square triangles. A 6.5 inch square is handy for fat quarters. These four sizes cover nearly every task a hobby quilter meets, and each earns its place without duplicating another.
Can I use a short quilting ruler to cut long fabric strips?
You can, but it is slower and less accurate. A short ruler forces you to reposition and realign for every strip, and each move introduces a chance of slipping off the grain. A 24 inch long ruler spans the folded width of most quilting fabric in one pass. If you already own a short ruler, use it for trimming and add a long ruler when you start cutting strips regularly. The long ruler pays for itself in fewer mis-cuts.
What is the difference between a quilting ruler and a machine quilting ruler?
A quilting ruler is a thick, clear acrylic template used with a rotary cutter to measure and cut fabric on a mat. A machine quilting ruler is a thinner template, often with a high-friction backing, used on a longarm or domestic machine to guide quilting stitches. They are not interchangeable. Buy the thick rotary-cutting ruler for fabric preparation and a separate machine ruler only if you quilt on a frame or longarm.

Related Posts

9 Benefits of Industrial Overlockers for Garment Production

Cleaning Sewing Machine Feed Dogs: A Practical Step-by-Step Guide

How to Adjust Sewing Patterns for a Full Bust

How to Calculate Fabric Yardage for Beginners

How to Clean and Oil Your Embroidery Machine Properly

How to Sew with Cotton Jersey Fabric: A Practical Guide
